
 THE ST. NAZAIRE RAID |
|
|
| |  |
| THE GREATEST RAID OF ALL "What a story it is, straight out of a Commando comic book." the guardian Jeremy Clarkson tells the story of one of the most daring operations of World War II -- the Commando raid on the German occupied dry dock at St. Nazaire in France on 28th March 1942. It was an operation so successful and so heroic that it resulted in the award of five Victoria Crosses and 80 other decorations for gallantry. | The Most Courageous Raid of WWII  |
 |  |
| The St Nazaire Raid or Operation Chariot was a successful British amphibious attack on the heavily defended Normandie dry dock atSt Nazaire in German-occupied France during the Second World War. The operation was undertaken by the Royal Navy and British Commandos under the auspices of Combined Operations Headquarters on 28 March 1942. St Nazaire was targeted because the loss of its dry dock would force any large German warship in need of repairs, such as the Tirpitz, to return to home waters rather than having a safe haven available on the Atlantic coast. The obsolete destroyer HMS Campbeltown, accompanied by 18 smaller craft, crossed the English Channel to the Atlantic coast of France and was rammed into the Normandie dock gates. The ship had been packed with delayed-action explosives, well hidden within a steel and concrete case, that detonated later that day, putting the dock out of service for the remainder of the war and up to ten years after. A force of commandos landed to destroy machinery and other structures. Heavy German gunfire sank, set ablaze or immobilised all the small craft intended to transport the commandos back to England; the commandos had to fight their way out through the town to try to escape overland. They were forced to surrender when their ammunition was expended and they were surrounded. After the raid 228 men of the force of 622 returned to Britain; 169 were killed and 215 became prisoners of war. German casualties were over 360 dead, mostly killed after the raid when Campbeltown exploded. To recognise their bravery, 89 decorations were awarded to members of the raiding party, including five Victoria Crosses. After the war St Nazaire was one of 38 battle honours awarded to the Commandos; the operation has since become known as The Greatest Raid of All. |
The start of Word War II. German invasion of Poland. September '39. German motorized troops on the streets of Warsaw. |
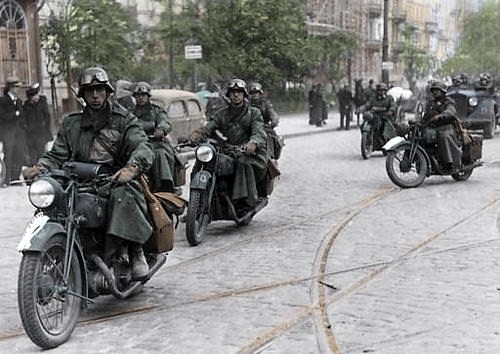


| The Allied governments declared war on Germany on 3 September; however, they failed to provide any meaningful support. The German-French border saw only a few minor skirmishes, although the majority of German forces, including 85% of their armoured forces, were engaged in Poland. Despite some Polish successes in minor border battles, German technical, operational and numerical superiority forced the Polish armies to retreat from the borders towards Warsaw and Lwów. The Luftwaffe gained air superiority early in the campaign. By destroying communications, the Luftwaffe increased the pace of the advance which overran Polish airstrips and early warning sites, causing logistical problems for the Poles. Many Polish Air Force units ran low on supplies, 98 of their number withdrew into then-neutral Romania. The Polish initial strength of 400 was reduced to just 54 by 14 September and air opposition virtually ceased. By 3 September, when Günther von Kluge in the north had reached the Vistula river (some 10 km (6.2 mi) from the German border at that time) and Georg von Küchler was approaching the Narew River, Walther von Reichenau's armor was already beyond the Warta river; two days later, his left wing was well to the rear of Łódź and his right wing at the town of Kielce. By 8 September, one of his armored corps—having advanced 225 km (140 mi) in the first week of the campaign—reached the outskirts of Warsaw. Light divisions on Reichenau's right were on the Vistula between Warsaw and the town of Sandomierz by 9 September while List—in the south—was on the San River above and below the town of Przemyśl. At the same time, Guderian led his 3rd Army tanks across the Narew, attacking the line of the Bug River, already encircling Warsaw. All the German armies made progress in fulfilling their parts of the Fall Weiss plan. The Polish armies were splitting up into uncoordinated fragments, some of which were retreating while others were launching disjointed attacks on the nearest German columns.
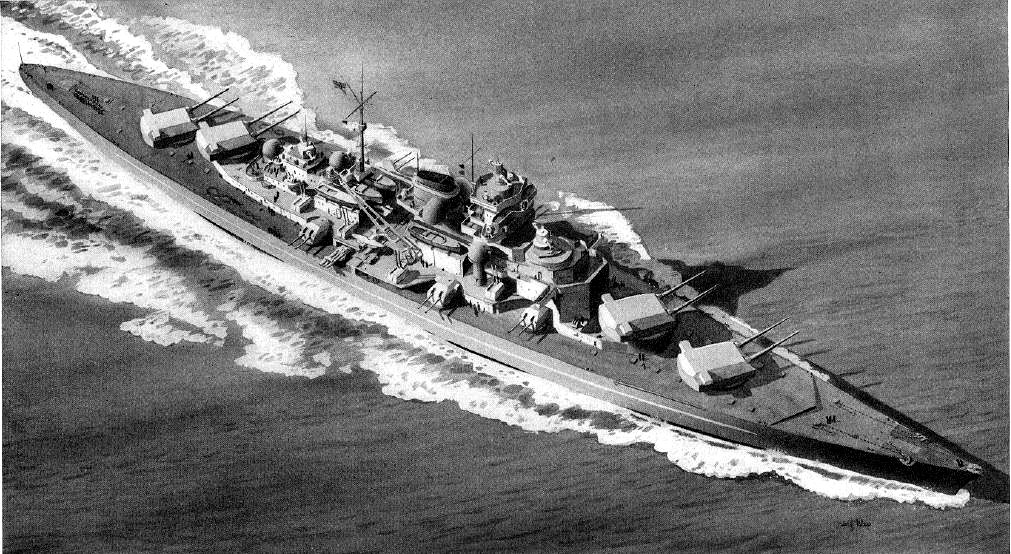
Cheerful German and Slovak soldiers posing with Ukrainian civilians in Komańcza, September 1939. |  In the course of the warship's short eight month career under its only commanding officer, Capt. Ernst Lindemann, Bismarck conducted only one offensive operation, in May 1941, codenamed Rheinübung. The ship, along with the heavy cruiser Prinz Eugen, was to break into the Atlantic Ocean and raid Allied shipping from North America to Great Britain. The two ships were detected several times off Scandinavia, however, and British naval units were deployed to block their route. At the Battle of Denmark Strait, Bismarck engaged and destroyed the battlecruiser HMS Hood, the pride of the Royal Navy, and forced the battleship HMS Prince of Wales to retreat with heavy damage, although Bismarck herself was hit three times and suffered an oil leak from a ruptured tank. |

On 24 May 1941, the Battle of the Denmark Strait was fought between the German ships Bismarck and Prinz Eugen and the British ships HMS Prince of Wales and HMS Hood. Hood was sunk and the damaged Prince of Wales was forced to retire. Bismarck, also damaged, ordered her consort to proceed independently while she headed for the French port of St Nazaire, which was the only port on the Atlantic coast with a drydock able to accommodate a ship of her size. She was intercepted by the British and sunk en route.
Britain's Naval Intelligence Division first proposed a commando raid on the dock in late 1941.When the German battleship Tirpitz was declared operational in January 1942, the Royal Navy (RN) and Royal Air Force (RAF) were already drawing up plans to attack her. Planners from Combined Operations Headquarters were looking at potential scenarios if Tirpitz escaped the naval blockade and reached the Atlantic.They decided the only port able to accommodate her was St Nazaire, especially if, like the Bismarck, she was damaged en route and needed repairs. They came to the conclusion that if the dock at St Nazaire was unavailable the Germans were unlikely to risk sending Tirpitz into the Atlantic.

![]()
SS Normandie in her namesake dock
Combined Operations examined a number of options while planning the destruction of the dock. At this stage of the war the British government still tried to avoid civilian casualties. This ruled out a bombing attack by the RAF, which at the time did not possess the accuracy needed to destroy the dock without serious loss of civilian life.[7] The Special Operations Executive were approached to see if its agents could destroy the dock gates. They decided that the mission was beyond their capabilities because the weight of explosives required too many agents just to carry them.[8] The RN were also unable to mount an operation, as St Nazaire is 8 km (5 miles) up the Loire estuary. Any naval ships large enough to cause sufficient damage would be detected well before they were within range.[7]
The planners then examined whether a commando force could be used. There was an unusually high spring tide due in March 1942, which would allow a light ship to pass over the sand banks in the estuary and approach the docks, bypassing the dredged and presumably well-defended channel. It would still be too shallow for infantry landing ships, but specially lightened destroyers might succeed
 St Nazaire docks, 1942
The purpose of the raid was to destroy three objectives: the Normandie dock, the old gates into the Basin de St Nazaire together with the water pumping machinery and other installations, and any U-boats or other shipping in the area. The initial Combined Operations plan required two specially lightened destroyers to carry out the raid. The first would be packed with explosives and rammed into the dock gates. Commandos on board would then disembark and use demolition charges to destroy nearby dock installations, searchlights and gun emplacements. The destroyer would then be blown up, and the second ship would come in and evacuate the ship's crew and the commandos. At the same time the RAF would carry out a number of diversionary air raids in the area.
When the plan was presented to the Admiralty, they refused to support it. The certain loss of one or both destroyers to eliminate the dry dock was out of the question. They suggested they could provide an old Free French ship, the Ouragan and a flotilla of small motor launches to transport the commandos and evacuate them afterwards.[9] Approval for the mission, codenamed Operation Chariot, was given on 3 March 1942. Using a French ship would involve using the Free French forces and increase the number of people aware of the raid. Consequently it was decided the navy would have to provide a ship of their own. The RAF complained that the raid would draw heavily on their resources; the number of aircraft assigned by RAF Bomber Command was reduced time and again before the day of the raid. British Prime Minister Winston Churchill further complicated matters when he ordered that bombing should only take place if targets were clearly identified.

The St. Nazaire U-boat pens in 2005
Combined Operations Headquarters worked closely with several intelligence organisations to plan the raid. The Naval Intelligence Division compiled information from a variety of sources. A detailed plan of the town of St Nazaire was provided by the Secret Intelligence Service, and information on the coastal artillery nearby was sourced from the War Office's Military Intelligence branch. Intelligence about the dock itself came from pre-war technical journals. The RN's Operational Intelligence Centre selected the route and timing for the raid based on intelligence about the location of minefields and German recognition signals sourced from Enigma decrypts and knowledge of Luftwaffe patrols compiled by the Air Ministry's Air Intelligence Branch.[5]When all the plans had been pulled together and the timing worked out, the raid was expected to last no longer than two hours. The commandos and crew from Campbeltown would board the motor launches at the Old Mole jetty and then return to base.

Associated Press correspondent Alvin Steinkopf broadcasting from the Free City of Danzig -- at the time, a semi-autonomous city-state tied to Poland. Steinkopf was relating the tense situation in Danzig back to America, on July 11, 1939. Germany had been demanding the incorporation of Danzing into the Third Reich for months, and appeared to be preparing military action. (AP Photo) #

Soviet premier Josef Stalin (second from right), smiles while Soviet Foreign Minister Vyacheslav Molotov (seated), signs the non-aggression pact with German Reich Foreign Minister Joachim von Ribbentrop (third from right), in Moscow, on August 23, 1939. The man at left is Soviet Deputy Defense Minister and Chief of the General Staff, Marshal Boris Shaposhnikov. The nonaggression pact included a secret protocol dividing eastern Europe into spheres of influence in the event of a conflict. The pact now guaranteed that Hitler's troops would face no resistance from the Soviets if they invaded Poland, bringing the war one step closer to reality. (AP Photo/File) #

Two days after Germany signed the non-aggression pact with the USSR, Great Britain entered into a military alliance with Poland, on August 25, 1939. This photo shows the scene one week later, on September 1, 1939, one of the first military operations of Germany's invasion of Poland, and the beginning of World War II. Here, the German battleship Schleswig-Holstein is bombing a Polish military transit depot at Westerplatte in the Free City of Danzig. Simultaneously, the German Air Force (Luftwaffe), and ground troops (Heer) were attacking several other Polish targets. (AP Photo) #

German soldiers comb the Westerplatte after it was surrendered to German units from the Schleswig-Holstein landing crew, on September 7, 1939. Fewer than 200 Polish soldiers defended the small peninsula, holding off the Germans for seven days. (AP Photo) #

Aerial view of bombs exploding during a German bombing run over Poland in September of 1939 (LOC) #

Two tanks of the SS-Leibstandarte Adolf Hitler Division cross the Bzura River during the German invasion of Poland in September of 1939. The Battle of Bzura, the largest of the entire campaign, lasted more than a week, ending with the German forces capturing most of western Poland. (LOC/Klaus Weill) #

Soldiers of the SS-Leibstandarte Adolf Hitler Division, resting in a ditch alongside a road on the way to Pabianice, during the invasion of Poland in 1939. (LOC/Klaus Weill) #

Warning:
This image may contain graphic or
objectionable content
Click to view image
A ten-year-old Polish girl named Kazimiera Mika mourns over her sister's body. She was killed by German machine-gun fire while picking potatoes in a field outside Warsaw, Poland, in September of 1939. (AP Photo/Julien Bryan) #

German advance guards and scouts are shown in a Polish town that has been under fire during the Nazi invasion of Poland, September 1939. (AP Photo) #

German infantry cautiously advance on the outskirts of Warsaw, Poland on September 16, 1939. (AP Photo) #

Several civilian prisoners of war, with arms raised, walk along a road during the German invasion of Poland in September of 1939. (LOC) #

Britain's King George VI broadcasts to the British nation on the first evening of the war, on September 3, 1939, in London. (AP Photo) #

A conflict which would end with the dropping of two nuclear bombs began with a proclamation read aloud by a town crier. Acting Town Crier and Saltbearer of the City of London, W.T. Boston, reads the war proclamation from the steps of the Royal Exchange, in London, on September 4, 1939. (AP Photo/Putnam) #

A crowd reads newspaper headlines, "Bombs Rain On Warsaw" as they stand outside the U.S. State Department building where diplomats held a conference on war conditions in Europe, on September 1, 1939. (AP Photo) #

On September 17, 1939, the Royal Navy aircraft carrier HMS Courageous was hit by torpedoes from the German submarine U-29, and sank within 20 minutes. The Courageous, on an anti-submarine patrol off the coast of Ireland, was stalked for hours by U-29, which launched three torpedoes when it saw an opening. Two of the torpedoes struck the ship on the port side, sinking it with the loss of 518 of its 1,259 crew members. (AP Photo) #

The scene of devastation seen on Ordynacka Street in Warsaw, Poland on March 6, 1940. The carcass of a dead horse lies in the street among enormous piles of debris. While Warsaw was under nearly constant bombardment during the invasion, on one day alone, September 25, 1939, about 1,150 bombing sorties were flown by German aircraft against Warsaw, dropping over 550 tons of high explosive and incendiary bombs on the city. (AP Photo) #

Warning:
This image may contain graphic or
objectionable content
Click to view image
German troops marching into the city of Bromberg (the German name for the Polish city of Bydgoszcz) found several hundred German nationals dead from Polish sniper fire. The snipers were equipped with arms by the retreating Polish forces. Bodies are shown on a forest road, September 8, 1939. (AP Photo) #

A damaged Polish armored train carrying tanks captured by the 14th SS-Leibstandard Adolf Hitler Division, near Blonie, during the invasion of Poland in September of 1939. (LOC/Klaus Weill) #

German soldiers, taken prisoner by the Polish army during the Nazi invasion, are shown while they were held captive in Warsaw, on October 2, 1939. (AP Photo) #

A young Polish boy returns to what was his home and squats among the ruins during a pause in the German air raids on Warsaw, Poland, in September of 1939. German attacks lasted until Warsaw surrendered on September 28. One week later, the last of the Polish forces capitulated near Lublin, giving full control of Poland to Germany and the Soviet Union. (AP Photo/Julien Bryan) #

Adolf Hitler salutes parading troops of the German Wehrmacht in Warsaw, Poland, on October 5, 1939 after the German invasion. Behind Hitler are, from left to right: Colonel General Walther von Brauchitsch, Lieutenant General Friedrich von Cochenhausen, Colonel General Gerd von Rundstedt, and Colonel General Wilhelm Keitel. (AP Photo)

| German Wehrmacht General Anton Dostler is tied to a stake before his execution by a firing squad in a stockade in Aversa, Italy, on December 1, 1945. The General, Commander of the 75th Army Corps, was sentenced to death by an United States Military Commission in Rome for having ordered the shooting of 15 unarmed American prisoners of war, in La Spezia, Italy, on March 26, 1944. (AP Photo) |
|
The St Nazaire Raid or Operation Chariot was a successful British amphibious attack on the heavily defended Normandie dry dock atSt Nazaire in German-occupied France during the Second World War. The operation was undertaken by the Royal Navy and British Commandos under the auspices of Combined Operations Headquarters on 28 March 1942. St Nazaire was targeted because the loss of its dry dock would force any large German warship in need of repairs, such as the Tirpitz, to return to home waters rather than having a safe haven available on the Atlantic coast. The obsolete destroyer HMS Campbeltown, accompanied by 18 smaller craft, crossed the English Channel to the Atlantic coast of France and was rammed into the Normandie dock gates. The ship had been packed with delayed-action explosives, well hidden within a steel and concrete case, that detonated later that day, putting the dock out of service for the remainder of the war and up to ten years after. A force of commandos landed to destroy machinery and other structures. Heavy German gunfire sank, set ablaze or immobilised all the small craft intended to transport the commandos back to England; the commandos had to fight their way out through the town to try to escape overland. They were forced to surrender when their ammunition was expended and they were surrounded. After the raid 228 men of the force of 622 returned to Britain; 169 were killed and 215 became prisoners of war. German casualties were over 360 dead, mostly killed after the raid when Campbeltown exploded. To recognise their bravery, 89 decorations were awarded to members of the raiding party, including five Victoria Crosses. After the war St Nazaire was one of 38 battle honours awarded to the Commandos; the operation has since become known as The Greatest Raid of All. St Nazaire is on the north bank of the Loire 400 km (250 miles) from the nearest British port, it had a population of 50,000 in 1942. The St Nazaire port has an outer harbour known as the Avant Port, formed by two piers jutting out into the Atlantic Ocean. This leads to two lock gates before the Basin de St Nazaire. These gates control the water level in the basin so that it is not affected by the tide. Beyond the basin is the larger inner dock called the Basin de Penhoët, which can accommodate ships up to 10,000 tons. There is also an old entrance to the Basin de St Nazaire located northwest of the Normandie dry dock. Built to house the ocean liner SS Normandie, this dock was the largest dry dock in the world when it was completed in 1932.[3] The "Old Mole" jetty juts into the Loire halfway between the southern pier of the Avant Port and the old entrance into the basin.[4] On 24 May 1941, the Battle of the Denmark Strait was fought between the German ships Bismarck and Prinz Eugen and the British ships HMS Prince of Wales and HMS Hood. Hood was sunk and the damaged Prince of Wales was forced to retire. Bismarck, also damaged, ordered her consort to proceed independently while she headed for the French port of St Nazaire, which was the only port on the Atlantic coast with a drydock able to accommodate a ship of her size. She was intercepted by the British and sunk en route.[3] Britain's Naval Intelligence Division first proposed a commando raid on the dock in late 1941.[5] When the German battleship Tirpitz was declared operational in January 1942, the Royal Navy (RN) and Royal Air Force (RAF) were already drawing up plans to attack her. Planners from Combined Operations Headquarters were looking at potential scenarios if Tirpitz escaped the naval blockade and reached the Atlantic.[6] They decided the only port able to accommodate her was St Nazaire, especially if, like the Bismarck, she was damaged en route and needed repairs. They came to the conclusion that if the dock at St Nazaire was unavailable the Germans were unlikely to risk sending Tirpitz into the Atlantic.[6]
SS Normandie in her namesake dock Combined Operations examined a number of options while planning the destruction of the dock. At this stage of the war the British government still tried to avoid civilian casualties. This ruled out a bombing attack by the RAF, which at the time did not possess the accuracy needed to destroy the dock without serious loss of civilian life.[7] The Special Operations Executive were approached to see if its agents could destroy the dock gates. They decided that the mission was beyond their capabilities because the weight of explosives required too many agents just to carry them.[8] The RN were also unable to mount an operation, as St Nazaire is 8 km (5 miles) up the Loire estuary. Any naval ships large enough to cause sufficient damage would be detected well before they were within range.[7] The planners then examined whether a commando force could be used. There was an unusually high spring tide due in March 1942, which would allow a light ship to pass over the sand banks in the estuary and approach the docks, bypassing the dredged and presumably well-defended channel. It would still be too shallow for infantry landing ships, but specially lightened destroyers might succeed.[9] Plan[edit source | editbeta]
St Nazaire docks, 1942 The purpose of the raid was to destroy three objectives: the Normandie dock, the old gates into the Basin de St Nazaire together with the water pumping machinery and other installations, and any U-boats or other shipping in the area.[10] The initial Combined Operations plan required two specially lightened destroyers to carry out the raid. The first would be packed with explosives and rammed into the dock gates. Commandos on board would then disembark and use demolition charges to destroy nearby dock installations, searchlights and gun emplacements.[11] The destroyer would then be blown up, and the second ship would come in and evacuate the ship's crew and the commandos. At the same time the RAF would carry out a number of diversionary air raids in the area.[9] When the plan was presented to the Admiralty, they refused to support it. The certain loss of one or both destroyers to eliminate the dry dock was out of the question. They suggested they could provide an old Free French ship, the Ouragan and a flotilla of small motor launches to transport the commandos and evacuate them afterwards.[9] Approval for the mission, codenamed Operation Chariot, was given on 3 March 1942. Using a French ship would involve using the Free French forces and increase the number of people aware of the raid. Consequently it was decided the navy would have to provide a ship of their own. The RAF complained that the raid would draw heavily on their resources; the number of aircraft assigned by RAF Bomber Command was reduced time and again before the day of the raid. British Prime Minister Winston Churchill further complicated matters when he ordered that bombing should only take place if targets were clearly identified.[8]
The St. Nazaire U-boat pens in 2005 Combined Operations Headquarters worked closely with several intelligence organisations to plan the raid. The Naval Intelligence Division compiled information from a variety of sources. A detailed plan of the town of St Nazaire was provided by the Secret Intelligence Service, and information on the coastal artillery nearby was sourced from the War Office's Military Intelligence branch. Intelligence about the dock itself came from pre-war technical journals. The RN's Operational Intelligence Centre selected the route and timing for the raid based on intelligence about the location of minefields and German recognition signals sourced from Enigma decrypts and knowledge of Luftwaffe patrols compiled by the Air Ministry's Air Intelligence Branch.[5]When all the plans had been pulled together and the timing worked out, the raid was expected to last no longer than two hours. The commandos and crew from Campbeltown would board the motor launches at the Old Mole jetty and then return to base.[12] Composition of the raiding force[edit source | editbeta]
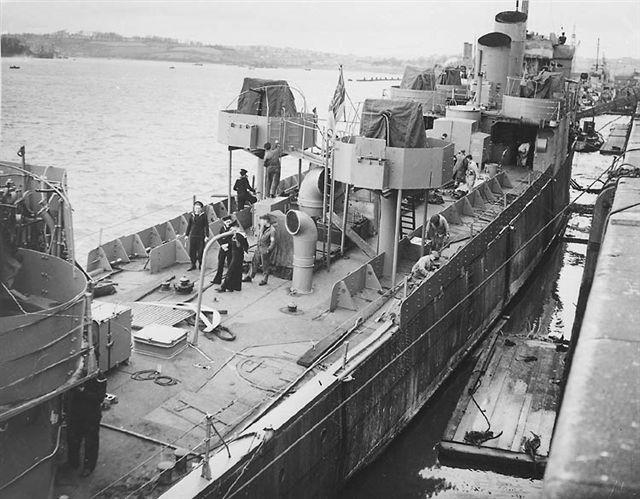
HMS Campbeltown being converted for the raid. There are twin lines of armour plate down each side of the ship and the Oerlikonmountings. Two of her funnels have been removed, with the remaining two cut at an angle The revised Combined Operations plan required one destroyer to ram the dock gates and a number of smaller craft to transport the Commandos. The Royal Navy would therefore provide the largest contingent for the raid, under the overall command of the senior naval officer, Commander Robert Ryder. The ship selected to ram into the dock gates was HMS Campbeltown, commanded by Lieutenant Commander Stephen Halden Beattie. TheCampbeltown was a First World War destroyer and had previously been the USS Buchanan in the United States Navy. She had come into RN service in 1940 as one of 50 destroyers transferred to the United Kingdom under the Destroyers for Bases Agreement.[12] Converting Campbeltown for the raid took ten days. She had to be lightened to raise her draught to get over the sand banks in the estuary. This was achieved by completely stripping all her internal compartments.[13] The dockyard removed her three 4 inch (100 mm) guns, torpedoes and depth charges from the deck and replaced the forward gun with a light quick–firing 12 pounder (3"). Eight 20 mm Oerlikons were installed on mountings raised above deck level.[14] The bridge and wheelhouse were given extra armour-plate protection, and two rows of armour were fixed along the sides of the ship to protect the Commandos on the open deck.[15] Two of her four funnels were removed, and the forward two were cut at an angle to resemble those of a German destroyer.[16] The bow was packed with 4.5 tons of high explosives, which were set in concrete.[13] It was decided that the explosive charge would be timed to detonate after the raiders had left the harbour. To prevent the Germans towing her away, the crew would open the ship's seacocks before abandoning the ship.[12] Should she become disabled or sunk before getting to the dock, four motor launches had been detailed to take off the crew and put the commandos ashore. The charge would be reset to explode after the last boat had left.[17]
British Commandos, 1942 Other naval units involved were two Hunt class destroyers, HMS Tynedale and Atherstone, which would accompany the force to and from the French coast and remain out at sea during the raid.[12] A Motor Gun Boat (MGB 314) was the headquarters ship for the raid, with Commander Ryder and the commanding officer of the Commandos on board.[18] A Motor Torpedo Boat (MTB 74), commanded by Sub-Lieutenant Michael Wynn,[19] had two objectives: If the outer Normandie dock gates were open, she had to torpedo the inner dock gates. If the gates were closed she would instead torpedo the gates at the old entrance into the St Nazaire basin.[12] To assist in transporting the Commandos, 12 motor launches (ML) were assigned from the 20th and 28th Motor Launch flotillas. These boats were re-armed with two Oerlikon 20 mm guns mounted forward and aft to complement their twin Lewis guns.[20][nb 2] At the last minute another four MLs were assigned from the 7th Motor Launch flotilla (see Footnotes for flotilla details). These four boats were also armed with two torpedoes each. Instead of transporting the Commandos, these boats were to engage any German shipping found in the estuary.[11] All the MLs had a 500 gallon auxiliary fuel tank fixed to the upper deck to increase their range.[22] The S class submarine HMS Sturgeon would leave before the rest of the convoy and be in position to act as a navigational beacon to guide the convoy into the Loire estuary.[12] The man selected to lead the Commando force was Lieutenant Colonel Charles Newman; his own No. 2 Commando would provide the largest Commandos contingent, 173 men, for the raid.[12][18] The Special Service Brigade headquarters used the raid to provide experience for their other units and 92 men were drawn from Nos 1, 3, 4, 5, 9, and 12 Commandos.[18][23][24] The Commandos were divided into three groups; One and Two would travel in the MLs, three would be in the Campbeltown. Under the command of Captain Hodgeson, Group One had the objectives of securing the Old Mole and eliminating the anti-aircraft gun positions around the southern quays. They were then to move into the old town and blow up the power station, bridges and locks for the new entrance into the basin from the Avant port.[25] The capture of the mole was a major objective, as it was to be the embarkation point for the evacuation after the mission.[26] Group Two, under the command of Captain Burn, would land at the old entrance to the St Nazaire basin. Their objectives were to take out the anti-aircraft positions in the area and the German headquarters, to blow up the locks and bridges at the old entrance into the basin and then to guard against a counter-attack from the submarine base.[25] Group Three was under the command of Major William 'Bill' Copland, who was also the Commandos' second in command. They were to secure the immediate area around the Campbeltown, destroy the dock's water-pumping and gate-opening machinery and the nearby underground fuel tanks.[26] All three groups were subdivided into assault, demolition and protection teams. The assault teams would clear the way for the other two. The demolition teams carrying the explosive charges only had sidearms for self-defence; the protection teams, armed with Thompson submachine guns, were to defend them while they completed their tasks.[26] The Commandos were aided in their planning for the operation by Captain Bill Pritchard of the Royal Engineers, who had pre-war experience as an apprentice in the Great Western Railway dockyards and whose father was the dock master of Cardiff Docks. In 1940, while part of the British Expeditionary Force in France, his duties had included examining how to disable the French dockyards if they were captured. One of the dockyards he had studied was St Nazaire, and he had submitted a report detailing how to put the dock out of action.[24] German forces[edit source | editbeta]
German 20 mm anti-aircraft gun The Germans had around 5,000 troops in the immediate area of St Nazaire.[27] The port was defended by the 280th Naval Artillery Battalion under the command of Kapitän zur See Edo Dieckmann. The battalion was composed of 28 guns of various calibres from 75 mm to 280 mm railway guns,[28] all positioned to guard the coastal approaches. The heavy guns were supplemented by the guns and searchlights of the 22nd Naval Flak Brigade[nb 3]under the command of Kapitän zur See Karl-Konrad Mecke. The brigade was equipped with 43 anti-aircraft guns ranging in calibre from 20 to 40 mm. These guns had a dual role as both anti-aircraft and coastal defence weapons. Many were in concrete emplacements on top of the submarine pens and other dockside installations of the St Nazaire submarine base.[28][29] The harbour defence companies were responsible for local defence and for the security of the ships and submarines moored in the harbour. These companies and the harbour defence boats used to patrol the river were under the command of Harbour Commander Korvettenkapitän Kellerman. The333rd Infantry Division was the German Army unit responsible for the defence of the coast between St Nazaire and Lorient. The division had no troops based in the town, but some were located in villages nearby and would be able to respond to any attack on the port.[30] The German Navy had at least three surface ships in the Loire estuary: a destroyer, an armed trawler and a Sperrbrecher (minesweeper), the latter being the guard ship for the port.[31] On the night of the raid there were also four harbour defence boats and ten ships from the 16th and 42nd Minesweeper flotillas berthed in the basin, while two tankers were berthed inside the Normandie dock.[28] The 6th and 7th U-Boat flotillas, commanded by Kapitänleutnant Georg-Wilhelm Schulz and Korvettenkapitän Herbert Sohler respectively, were permanently based in the port. It is not known how many submarines were present on the day of the raid. The submarine base had been inspected by the U-Boat Commander in Chief, Vizeadmiral Karl Dönitz, the day before the raid. He asked what would they do if the base was subject to an attack by British Commandos. Sohler replied that "an attack on the base would be hazardous and highly improbable".[32] The raid[edit source | editbeta]Outward journey[edit source | editbeta]The three destroyers and 16 small boats left Falmouth, Cornwall at 14:00 on 26 March 1942.[2] They formed into a convoy of three lanes, with the destroyers in the middle. On arrival at St Nazaire the portside MLs were to head for the Old Mole to disembark their Commandos, while the starboard lane would make for the old entrance to the basin to disembark theirs. Not having the range to reach St Nazaire unaided, the MTB and MGB were taken under tow by the Campbeltown and Atherstone.[26] On 27 March at 07:20 Tynedale reported a U-Boat on the surface and opened fire.[33] The two escort destroyers left the convoy to engage the U-Boat, later identified as U-593. The U-Boat promptly dived and was unsuccessfully attacked by depth charges. The two destroyers returned to the convoy at 09:00.[27] The convoy next encountered two French fishing trawlers. Both crews were taken off and the ships sunk for fear they might report the composition and location of the convoy.[27] At 17:00 the convoy received a signal from Commander-in-Chief Plymouth that five German torpedo boats were in the area. Two hours later another signal informed them that another two Hunt class destroyers, HMS Cleveland and HMS Brocklesby, had been dispatched at full speed to join the convoy.[34][nb 4] The convoy reached a position 65 nautical miles (120 km; 75 mi) off St Nazaire at 21:00 and changed course toward the estuary, leaving Atherstone and Tynedale as a sea patrol.[36] The convoy adopted a new formation with the MGB and two torpedo MLs in the lead, followed by Campbeltown. The rest of the MLs formed two columns on either side and astern of the destroyer, with the MTB bringing up the rear.[37] The first casualty of the raid was ML 341, which had developed engine trouble and was abandoned. At 22:00 the submarine Sturgeon directed her navigation beacon out to sea to guide the convoy in. At about the same time the Campbeltown raised the German naval ensign in an attempt to deceive any German lookouts into thinking she was a German destroyer.[27] At 23:30 on 27 March, five RAF squadrons (comprising 35 Whitleys and 27 Wellingtons) started their bombing runs. The bombers had to stay above 6,000 feet (1,800 m) and were supposed to remain over the port for 60 minutes to divert attention toward themselves and away from the sea. They had orders to only bomb clearly identified military targets and to drop only one bomb at a time. As it turned out, poor weather over the port (10/10ths cloud) meant that only four aircraft bombed targets in St Nazaire. Six aircraft managed to bomb other nearby targets.[27][38] The unusual behaviour of the bombers concerned Kapitän zur See Mecke. At 00:00 on 28 March, he issued a warning that there might be a parachute landing in progress. At 01:00 on 28 March, he followed up by ordering all guns to cease firing and searchlights to be extinguished in case the bombers were using them to locate the port. Everyone was placed on a heightened state of alert. The harbour defence companies and ships' crews were ordered out of the air raid shelters. During all this a lookout reported seeing some activity out at sea, so Mecke began suspecting some type of landing and ordered extra attention to be paid to the approaches to the harbour.[39] The run-in[edit source | editbeta]
HMS Campbeltown wedged in the dock gates. Note the exposed forward gun position on Campbeltown and the German anti-aircraft gun position on the roof of the building at the rear At 00:30 hours on 28 March the convoy crossed over the shoals at the mouth of the Loire estuary, with the Campbeltown scraping the bottom twice. Each time she was able to pull free, and the group proceeded on up toward the harbor in darkness. They had got to within about eight minutes passage from the dock gates when at 01:22 the entire convoy was illuminated by the combined searchlights of both banks of the estuary. A naval signal light demanded their identification.[31] The MGB-314 replied in a coded response obtained from a German trawler boarded during the Vagsoy mission. A few bursts were fired from a shore battery and both the Campbeltown and the MGB-314 replied: "Ship being fired upon by friendly forces" The deception gave them a couple more precious minutes before every German gun in the bay opened fire.[40] At 01:28, with the convoy a 1 mile (1.6 km) from the dock gates, Beattie ordered the German flag lowered and the White Ensign raised. The intensity of the German fire seemed to increase. The guard ship opened fire but was quickly silenced when the ships in the convoy responded, shooting into her as they passed.[41] By now all the ships in the convoy were within range to engage targets ashore and were firing at the gun emplacements and searchlights. Campbeltown was hit a number of times but still increased her speed to 19 kn (35 km/h). The helmsman on her bridge was killed; his replacement was wounded and replaced as well.[42] Blinded by the searchlights, Beattie knew they were close to their objective. Still under heavy fire, the MGB turned into the estuary as the Campbeltown cleared the end of the Old Mole, cut through anti-torpedo netting strung across the entrance and rammed the dock gates, striking home at 01:34, three minutes later than scheduled. The force of the impact drove the ship 33 feet (10 m) onto the gates.[31] Disembarkation from the Campbeltown and the MLs[edit source | editbeta]
Commando prisoners under German escort The Commandos on Campbeltown now disembarked: two assault teams, five demolition teams with their protectors and a mortar group.[37] Three demolition teams were tasked with destroying the dock pumping machinery and other installations associated with the drydock. The kilt wearing Captain Donald Roy - 'The Laird' and his 14 man assault troop were tasked with taking out two pump-house roof-top gun emplacements high above the quayside and securing a bridge to provide a route for the raiding parties to exit the dock area. Roy and Sgt Don Randall used scaling ladders and grenades to accomplish the former and a head on rush to secure the bridge and form a bridgehead that enabled Capt. Bob Montgomery and Lt Corran Purdon and their demolition teams to exit the area.[43][44] They lost 4 men in this action. The fifth team also succeeded in completing all their objectives but almost half its men were killed. The other two Commando groups were not as successful. The MLs transporting Groups One and Two had almost all been destroyed on their approach. ML 457 was the only boat to land its Commandos on the Old Mole and only ML 177 had managed to reach the gates at the old entrance to the basin.[45] That team succeeded in planting charges on two tugboats moored in the basin.[46] There were only two other MLs in the vicinity: ML 160 had continued past the dock and was engaging targets upriver, ML 269 appeared to be out of control and was running in circles. By this time the crew of Campbeltown had detonated the scuttling charges and gathered at the rear of the ship to be taken off. ML 177 came alongside the destroyer and took 30 men on board including Beattie and some of the wounded. Major Copland went through Campbeltownand evacuated the wounded towards the Old Mole, not knowing that there were no other boats there to take the Commandos off.[45] Lt Col Newman aboard the MGB, need not have landed, but he was one of the first ashore. One of his first actions was to direct mortar fire onto a gun position on top of the submarine pens that was causing heavy casualties among the Commandos. He next directed machine-gun fire onto an armed trawler, which was forced to withdraw upriver. Newman organised a defence that succeeded in keeping the increasing numbers of German reinforcements at bay until the demolition parties had completed their tasks.[47] Some 100 Commandos were still ashore when Newman realised that evacuation by sea was no longer an option. He gathered the survivors and issued three orders:
Newman and Copland led the charge from the old town across a bridge raked by machine gun fire and advanced into the new town. The Commandos attempted to get through the narrow streets of the town and into the surrounding countryside, but were eventually surrounded. When their ammunition was expended their only option was to surrender.[45][47][49] Not all the Commandos were captured; five men reached neutral Spain, from where they eventually returned to England.[50] Small ships[edit source | editbeta]
Most of the MLs had been destroyed on the run in and were burning. The first ML in the starboard column was the first boat to catch fire; her captain managed to beach her at the end of the Old Mole. Some starboard boats managed to reach their objective and disembark their Commandos. ML 443, the leading boat in the port column, got to within 10 feet (3.0 m) of the mole in the face of heavy direct fire and hand grenades before being set on fire. The crew were rescued by ML 160, one of the torpedo MLs which had been looking for targets of opportunity such as the two large tankers reported to be in the harbour.[51] The commanders of MLs 160 and 443, Lieutenants T Boyd and T D L Platt, were awarded the Distinguished Service Order for their bravery.[52][nb 5] The rest of the port column had been destroyed or disabled before reaching the mole.[54] MLs 192 and 262 were set on fire; there were only six survivors. ML 268 was blown up; one man survived.[55] ML 177, the launch that had successfully taken off some of the crew fromCampbeltown, was sunk on her way out of the estuary.[56] ML 269, another torpedo-armed boat, had the unenviable task of moving up and down the river at high speed to draw German fire away from the landings. Soon after passing Campbeltown it was hit and its steering damaged. It took ten minutes to repair the steering. They turned and started in the other direction, opening fire on an armed trawler in passing. Return fire from the trawler set their engine on fire.[57]
The German torpedo boat Jaguar ML 306 also came under heavy fire when it arrived near the port. Sergeant Thomas Durrant of No. 1 Commando, manning the aft Lewis gun, engaged gun and searchlight positions on the run in. He was wounded but refused to leave the gun for treatment. The ML reached the open sea but was attacked at short range by the German torpedo boat Jaguar. Durrant returned fire, aiming for the torpedo boat's bridge. He was wounded again but remained at his gun even after the German commander asked for their surrender. Firing drum after drum of ammunition, he refused to give up until after the ML had been boarded. Durrant died of his wounds and, after the recommendation of the Jaguar's commander, was awarded a posthumous Victoria Cross.[34][58] After the Commando headquarters group had landed, Commander Ryder went to check for himself that Campbeltown was firmly stuck in the dock. Some of her surviving crewmen were being taken on board the MGB. Ryder returned to the boat and ordered the MTB to carry out its alternative task and torpedo the lock gates at the old entrance to the basin. After a successful torpedo attack, Ryder ordered the MTB to leave. On their way out of the estuary they stopped to collect survivors from a sinking ML and were hit and set on fire.[59] Back at the docks the MGB had positioned itself in mid-river to engage enemy gun emplacements. The forward 2 pounder was manned by Able Seaman William Alfred Savage. Commander Ryder reported that
Motor Gun Boat 314 Ryder could see no ships other than seven or eight burning MLs. He then realised that the landing places at the Old Mole and the entrance to the basin had both been recaptured by the Germans.[2] There was nothing more they could do for the Commandos, so they headed out to sea. On their way they were continuously illuminated by German searchlights and were hit at least six times by the German guns. Passing ML 270, they ordered her to follow and made smoke to hide both boats. When they reached the open sea the smaller calibre guns were out of range and stopped firing but the heavier artillery continued to engage them. The boats were about 4 miles (6.4 km) off-shore when the last German salvo straddled them and killed Savage, who was still at his gun. He was awarded a posthumous Victoria Cross for his exploits. His citation recognised both Savage and the bravery of "the many unnamed crews of the Motor Gun Boat, Motor Torpedo Boat and Motor Launches who continued to carry out their duties in exposed positions, in the face of close range enemy fire."[52] Return journey[edit source | editbeta]
The remains of an unidentified Motor Launch, 28 March 1942 At 06:30 the five German torpedo boats that the convoy had evaded the previous day were sighted by HMS Atherstone and Tynedale. The two destroyers turned toward them and opened fire at a range of 7 miles (11 km). After ten minutes the German boats turned away, making smoke.[60] The destroyers sighted the MGB and two accompanying MLs soon after and transferred their casualties to the Atherstone. Not expecting any more boats to arrive, they headed for home. Just after 09:00 the destroyers Brocklesby and Cleveland arrived, sent by Commander-in-Chief Plymouth. Shortly after this the ships were spotted by a Heinkel 115 floatplane of the Luftwaffe.[2] The next aircraft on the scene, a Junkers 88, was engaged by a RAF Bristol Beaufighter which had appeared in the area earlier. Both machines crashed into the sea. Other German planes arrived but were driven off by Beaufighters and Hudsons from Coastal Command. The Atlantic weather conditions deteriorated. Amid concerns about the growing German threat and the realisation that the damaged small ships would not be able to keep up, Commander Sayer ordered the crews off the smaller boats and had them sunk.[61] Three of the small vessels managed to return to England: MLs 160, 307 and 443.[62] They had reached the rendezvous and waited until 10:00 for the destroyers to appear. Having already been attacked once, they moved further out into the Atlantic to try and avoid the German Air Force, but a Junkers 88 appeared overhead at 07:30 and approached them at low level for a closer look. The ships opened fire and hit the Junkers in the cockpit. The plane went into the sea. The next aircraft to appear was a Blohm and Voss seaplane which attempted to bomb the ships, but left after being damaged by machine-gun fire. The surviving MLs eventually reached England unaided the following day.[63] Campbeltown explodes[edit source | editbeta]
Close up of HMS Campbeltown after the raid. Note the shell damage in the hull and upper works and the German personnel on–board the vessel The explosive charges in HMS Campbeltown detonated at noon on 28 March 1942, the dry dock was destroyed.[64] Both tankers that were in the dock were swept away by the wall of water and sunk,[65] (or just swept to the far end of the Dock, but not sunk).[66] A party of 40 senior German officers and civilians who were on a tour of the ship were killed. In total, the explosion killed about 360 men.[67] The wreck of the Campbeltown could still be seen inside the dry dock months later when RAF photo reconnaissance planes were sent to photograph the port.[68] The day after the explosion, Organisation Todt workers were assigned to clean up the debris and wreckage. On 30 March at 16:30 the torpedoes from MTB 74, which were on a delayed fuse setting, exploded at the old entrance into the basin. This raised alarms among the Germans. The Organisation Todt workers ran away from the dock area. German guards, mistaking their khaki uniforms for British uniforms, opened fire, killing some of them. The Germans also thought that some Commandos were still hiding in the town, and made a street by street search, during which some townspeople were also killed.[64] Aftermath[edit source | editbeta]
Surviving British commandos, mission completed, are taken into captivity
The Normandie Dock months after the raid. The wreck of HMS Campbeltown is dwarfed by the size of the dock. he explosion put the dry dock out of commission until the end of the war.[69] The St Nazaire raid had been a success, but at a cost. Of the 622 men of the Royal Navy and Commandos who took part in the raid, only 228 men returned to England. Five escaped overland via Spain and Gibraltar. 169 men were killed (105 RN and 64 Commandos) and another 215 became prisoners of war (106 RN and 109 Commandos). They were first taken to La Baule and then sent to Stalag 133 at Rennes.[13][49] The fallen British raiders were buried at the Escoublac-la-Baule cemetery with military honors. The cemetery is located 13 kilometres west of St Nazaire. To recognise their achievement, 89 decorations were awarded for the raid. This total includes the five Victoria Crosses awarded to Lieutenant Commander Beattie, Lieutenant Colonel Newman and Commander Ryder, and posthumous awards to Sergeant Durrant and Able Seaman Savage. Other decorations awarded were four Distinguished Service Orders, four Conspicuous Gallantry Medals, five Distinguished Conduct Medals, 17 Distinguished Service Crosses, 11 Military Crosses, 24 Distinguished Service Medals and 15Military Medals. Four men were awarded the Croix de Guerre by France, another 51 were mentioned in dispatches
The number of Free French troops grew with Allied success in North Africa and subsequent rallying of the Army of Africa which pursued the fight against the Axis fighting in many campaigns and eventually invading Italy, occupied France and Germany from 1944 to 1945. On 23 October 1944, Britain, the United States, and the Soviet Union officially recognized de Gaulle's regime as the provisional government of France (GPRF) which replaced the in-exile French State (relocated at Sigmarigen, a short-living City State in western Germany) and preceded the Fourth Republic (1946). Recruitment in liberated France led to notable enlargements of the French armies. By the end of the war in Europe in May 1945, France had 1,250,000 troops, 10 divisions of which were fighting in Germany. An expeditionary corps was created to liberate French Indochina then occupied by the Japanese. During the course of the war, French military losses totaled 212,000 dead, of which 92,000 were killed through the end of the campaign of 1940, 58,000 from 1940 to 1945 in other campaigns, 24,000 lost while serving in the French resistance, and a further 38,000 lost while serving with the German Army.[1] Among the odd aspects of French military history in the war were limited French participation in the Normandy beach landings of June 1944 (Free French SAS of Major Philippe Kieffer) and the presence of French SS among the defenders of Berlin in May 1945 (33rd SS Division commanded by Hauptsturmführer Henri Fenet).
German strategy Hitler had always fostered dreams about major military campaigns to defeat the Western European nations as a preliminary step to the conquest of territory in Eastern Europe, thus avoiding a two-front war. However, these intentions were absent from Führer-Directive N°6.[13] This plan was firmly based on the seemingly more realistic assumption that Germany's military strength would still have to be built up for several more years and that for the moment only limited objectives could be envisaged. They were aimed at improving Germany's ability to survive a long, protracted war in the West.[14] Hitler ordered a conquest of the Low Countries to be executed at the shortest possible notice. This would stop France from occupying them first, and prevent Allied air power from threatening the vital German Ruhr Area.[15] It would also provide the basis for a successful long-term air and sea campaign against Britain. There was no mention in the Führer-Directive of any immediate consecutive attack to conquer the whole of France, although as much as possible of the border areas in northern France should be occupied.[13] While writing the directive, Hitler had assumed that such an attack could be initiated within a period of at most a few weeks, but the very day he issued it he was disabused of this illusion. It transpired that he had been misinformed about the true state of Germany's forces. The motorized units had to recover, repairing the damage to their vehicles incurred in the Polish campaign, and ammunition stocks were largely depleted.[16] [edit] Similarity to Schlieffen PlanOn 10 October 1939, the British refused Hitler's offer of peace; on 12 October, the French did the same. Franz Halder, the chief of staff of the German Army (Generalstabschef des Heeres), presented the first plan for Fall Gelb ("Case Yellow") on 19 October, the pre-war codename of plans for campaigns in the Low Countries: the Aufmarschanweisung N°1, Fall Gelb ("Deployment Instruction No. 1, Case Yellow"). Halder's plan has often been compared to the Schlieffen Plan, which the Germans attempted to execute in 1914 during the opening phase of the First World War.[17] It was similar in that both plans entailed an advance through the middle of Belgium, but while the intention of the Schlieffen Plan was to gain a decisive victory by executing a surprise encirclement of the French Army, Aufmarschanweisung N°1 was based on an unimaginative frontal attack, sacrificing a projected half a million German soldiers to attain the limited goal of throwing the Allies back to the River Somme. Germany's strength for 1940 would then be spent; only in 1942 could the main attack against France begin.[18] Hitler was very disappointed with Halder's plan and reacted first by deciding that the German army should attack early, ready or not, in the hope that Allied unpreparedness might bring about an easy victory. This led to a series of postponements, as time and again commanders convinced Hitler to delay the attack for a few days or weeks to remedy some critical defect in the preparations, or to wait for better weather. Hitler also tried to alter the plan which he found unsatisfactory, without clearly understanding how it could be improved. This mainly resulted in a dispersion of effort, since besides the main axis in central Belgium, secondary attacks were foreseen further south. Hitler made such a suggestion on 11 November.[19] On 29 October, Halder let a second operational plan, Aufmarschanweisung N°2, Fall Gelb, reflect these changes by featuring a secondary attack on the Netherlands.[20] Hitler was not alone in disliking Halder's plan. General Gerd von Rundstedt, the commander of Army Group A, also disagreed with it. Unlike Hitler, von Rundstedt understood perfectly well how it should be rectified as a professional soldier. Its fundamental flaw was that it did not conform to the classic principles of the Bewegungskrieg ("manoeuvre warfare") which had been the basis of German operations since the 19th century. A breakthrough would have to be accomplished that would result in the encirclement and destruction of the main body of Allied forces. The logical place to achieve this would be in the region of Sedan, which lay in the sector of von Rundstedt's Army Group. On 21 October, von Rundstedt agreed with his chief of staff, Generalleutnant Erich von Manstein, that an alternative operational plan had to be arranged that would reflect these basic ideas, making Army Group A as strong as possible at the expense of Army Group B to the north.[21] [edit] Manstein PlanFurther information: Manstein Plan
The evolution of German plans for Fall Gelb, the invasion of the Low Countries. The series begins at the left upper corner. Whilst von Manstein was formulating new plans in Koblenz, Generalleutnant Heinz Guderian, commander of the XIX Army Corps, Germany's elite armoured formation, happened to be lodged in a nearby hotel.[22] At this moment, von Manstein's plan consisted of a move directly north from Sedan against the rear of the main Allied forces in Belgium. When Guderian was invited to contribute to the plan during informal discussions, he proposed a radical and novel idea.[20] Not only his army corps, but most of the Panzerwaffe should be concentrated at Sedan. This concentration of armour should subsequently not move to the north but to the west, to execute a swift, deep, independent strategic penetration towards the English Channel without waiting for the main body of infantry divisions. This might lead to a strategic collapse of the enemy, avoiding the relatively high number of casualties normally caused by a Kesselschlacht ("annihilation battle"). Such a risky independent use of armour had been widely discussed in Germany before the war but had not been accepted as received doctrine. The German General Staff, however, doubted such an operation could work.[23] Von Manstein's operational idea won immediate support from Guderian. Guderian understood the terrain, having experienced the conditions with the German Army in 1914 and 1918.[24] Von Manstein wrote his first memorandum outlining the alternative plan on 31 October. In it he carefully avoided mentioning Guderian's name and downplayed the strategic part of the armoured units, in order to not generate unnecessary resistance.[25] Six more memoranda followed between 31 October 1939 and 12 January 1940, each becoming more radical in outline. All were rejected by the OKH, the German Army's headquarters, and nothing of their content reached Hitler.[24] [edit] Mechelen IncidentOn 10 January, a German Messerschmitt Bf 108 made a forced landing at Maasmechelen, north of Maastricht, in Belgium (the so-called "Mechelen Incident"). Among the occupants of the aircraft was Luftwaffe Major Hellmuth Reinberger, who was carrying a copy of the latest version of Aufmarschanweisung N°2. Reinberger was unable to destroy the documents, which quickly fell into the hands of the Belgian intelligence services.[26] It has often been suggested that this incident was the cause of a drastic change in German plans, but this is incorrect; in fact, a reformulation of them on 30 January, Aufmarschanweisung N°3, Fall Gelb, conformed to the earlier versions.[27] [edit] Adoption of Manstein PlanOn 27 January, von Manstein was relieved of his appointment as Chief of Staff of Army Group A and appointed commander of an army corps in Prussia, to begin his command in Stettin on 9 February, a move instigated by Halder to reduce von Manstein's influence.[28] Von Manstein's indignant staff brought his case to Hitler's attention. Hitler had, without any knowledge of von Manstein's plan, suggested an attack focused at Sedan but had been persuaded to forget the idea as it was too risky. On 2 February, von Manstein's plan was brought to his attention. On 17 February, Hitler summoned von Manstein, Generals Rudolf Schmundt (the German Army's Chief of Personnel) and Alfred Jodl, the Chief of Operations at the OKW (the German armed forces' supreme command), to attend a conference. Hitler sat and listened, abandoning his habits of interrupting and launching into monologues. In the end, he agreed to all of von Manstein's suggestions.[29] The next day, he ordered the plans to be changed in accordance with von Manstein's ideas. They appealed to Hitler mainly because they offered some real hope of victory.[30] Hitler recognized the breakthrough at Sedan only in tactical terms, whereas von Manstein saw it as a means to an end. He envisaged an operation to the English Channel and the encirclement of the Allied armies in Belgium, which, if carried out correctly, could have a favourable strategic outcome.[31][32] Halder had no intention of deviating from established doctrine by allowing an independent strategic penetration by the seven armoured divisions of Army Group A.[33] Much to the outrage of Guderian, this element was at first completely removed from the new plan, Aufmarschanweisung N°4, Fall Gelb, issued on 24 February.[20] However, Halder went through an "astonishing change of opinion".[34] Halder was criticized in the same way he had attacked von Manstein when he first suggested it. The bulk of the German officer corps was appalled by the plan, and they called him the "gravedigger of the Panzer force".[35] Even when adapted to more conventional methods, the new plan provoked a storm of protest from the majority of German generals. They thought it utterly irresponsible to create a concentration of forces in a position where they could not possibly be sufficiently supplied, while such inadequate supply routes as there were could easily be cut off by the French. If the Allies did not react as expected, the German offensive could end in catastrophe.[36] Their objections were ignored. Halder argued that, as Germany's strategic position seemed hopeless anyway, even the slightest chance of a decisive victory outweighed the certainty of ultimate defeat implied by inaction.[37] [edit] BlitzkriegMain article: Blitzkrieg The strategy, operational methods and tactics of the German Army and Luftwaffe has often been labelled "Blitzkrieg" (Lightning War). The concept is deeply controversial and is connected to the problem of the precise nature and origin of "Blitzkrieg" operations, of which the 1940 campaign is often described as a classic example. An essential element of "Blitzkrieg" was considered to be a strategic, or series of operational developments, executed by mechanised forces which led to the total collapse of the defenders' armed forces. "Blitzkrieg" has also been looked on as a revolutionary form of warfare. In recent years, its novelty and even its very existence have been disputed.[38][39] Rapid and decisive victories had been pursued by armies well before the Second World War. In the German wars of unification and First World War campaigns, the German General Staff had attempted Bewegungskrieg (Movement War), similar to the modern perception of "Blitzkrieg", with varying degrees of success. During the First World War, these methods often succeeded in achieving tactical breakthroughs, but the operational exploitation took time as armies lacked motorisation, could not move quickly, and sometimes failed to achieve a decisive victory altogether. The development of tanks, aircraft, and more importantly, motorised infantry and artillery, enabled the Germans to implement these old methods again with new technology in 1940. The combustion engine solved the problem of operational level exploitation.[40] When dealing with "Blitzkrieg" as a concept, things become complicated. It is seen as an anomaly and there is no explicit reference to such strategy, operations or tactics in the German battle plans. There is no evidence in German military art, strategy or industrial preparation that points to the existence of a thought out "Blitzkrieg" tendency.[41][42] Evidence suggests that the German Reich was preparing for a long sustained war of attrition, not a quick war of manoeuvre. Hitler's miscalculations in 1939 forced him into war before he was ready, and under these circumstances the German General Staff reverted to attempting to win a quick war, before the economic and material superiority of the Allies could make a difference, although this was not their original intention.[43] It was only after the defeat of France in 1940, that the German military pursued a "Blitzkrieg"-kind of warfare to achieve its ambitions in Europe. German historian Karl-Heinz Frieser explained:
[edit] Allied strategy[edit] Early actionsIn September 1939, Belgium and the Netherlands were still neutral. They had made arrangements in secret with the Entente (as the Allies were still widely called) for future cooperation should the Germans invade their territory. The Supreme Commander of the French Army—Maurice Gamelin—suggested during that month that the Allies should take advantage of the fact that Germany was tied up in Poland by using the Low Countries as a spring board to attack Germany. This suggestion was not taken up by the French government.[45] Just after the 1 September 1939 invasion of Poland, French soldiers advanced along the Maginot Line 5 km (3.1 mi) into the Saar which was called the Saar Offensive. France had employed 98 divisions (all but 28 of them reserve or fortress formations) and 2,500 tanks against German forces consisting of 43 divisions (32 of them reserves) and no tanks. They advanced until they met the then thin and undermanned Siegfried Line. The French army would easily have been able to penetrate the mere screen of German forces present had they continued with the offensive, but they preferred to force the Germans into the offensive role and withdrew to their own lines in October.[46] [edit] Dyle PlanFurther information: Dyle Plan Strategic reasons dictated the Allied decision to advance and fight on Belgian territory when the German attack came in the west. The British government insisted that the Flemish coast remain under Allied control so as not to threaten British naval supremacy. The French determined that the German offensive had to be contained as far east as possible, to keep the battles off French territory. Finally, and for him personally, the most cogent argument for advancing and fighting on Belgian territory was that Gamelin did not consider the French army capable of winning a mobile battle against the German army in the wide operational theatre France would present. Belgium presented a far narrower front to contain German formations. He also argued that an advance to the Dyle river and preparing an entrenched front there saved most of Belgium's industrial regions from falling into German hands.[47] Gamelin did not have the personality to simply impose his will. The first step he took was to propose the "Escaut" variant as an option for Plan D, the code for the "Dyle plan".[48] This would include an advance by the French onto Dutch territory.[49] The powerful French 1st and 9th Armies would hold the line in Belgium, from Wavre to Givet. The French 7th Army would hold the line on the Scheldt and link up with Dutch forces. The Belgian Army would hold the Ghent-Antwerp line. They would be reinforced by the British Army, which would hold the section of the line east of Brussels, from Wavre to Louvain.[50] Gamelin made the reasonable assumption that the Germans would try to attempt a breakthrough by concentrating their mechanised forces. They could hardly hope to break the Maginot Line on his right flank or to overcome the Allied concentration of forces on the left flank.[51] That only left the centre, but most of the centre was covered by the river Meuse. Tanks were limited in defeating fortified river positions. However, at Namur the river made a sharp turn to the east, creating a gap between itself and the river Dyle. This 'Gembloux Gap', ideal for mechanised warfare, was a very dangerous weak spot. Gamelin decided to concentrate half of his armoured reserves there, sure the main German thrust would be on the Belgian-Dutch plain.[51] Gamelin reasoned that the Germans might try to overcome the Meuse position by using infantry, but he was confident in the Belgians' ability to hold the line and believed that while it was possible for the Germans to cross the Meuse, it would take a long time to achieve. Gamelin made no study in the event of a German breakthrough in the south, and as a consequence, did not make preparations to extricate Allied forces from Belgium.[52] Gamelin continued with his plans despite repeated criticism from his subordinates. Gaston Billotte (the commander-in-chief of the First Army Group) and Alphonse Joseph Georges (commander-in-chief of the North-Eastern front which included the First and Second Army Groups) were particularly critical. Georges pointed out the decisive problem. He suggested that Gamelin was too sure the German plan involved the battles, or main effort, being fought in the Netherlands and Belgium. He argued that it seemed as if Gamelin was allowing himself to be drawn into the Low Countries. He even suggested that an attack in Belgium might be a diversion. In this case, if the main forces were sent into Belgium and "the main enemy attack came in our centre, on our front between the Meuse and the Moselle, we could be deprived of the necessary means to repel it".[53] The development of Allied strategy was exclusively in the hands of the French. The British, recognizing they were the smaller partner in the alliance, agreed to French proposals.[54] [edit] Allied intelligenceIn the winter of 1939–1940, the Belgian consul-general in Cologne had anticipated the angle of advance that Von Manstein was planning. Through intelligence reports, they deduced that German forces were concentrating along the Belgian and Luxembourg frontiers. The Belgians were convinced that the Germans would thrust through the Ardennes and to the English Channel with the aim of cutting off the Allied field Armies in Belgium and north-eastern France. They also anticipated that the Germans would try to land airborne and glider forces behind the Allied lines to break open Belgian fortifications. Such warnings were not heeded by the French, or British.[55] In March 1940, Swiss intelligence detected six or seven Panzer Divisions on the German-Luxembourg-Belgian border. More motorized divisions had also been detected in the area. French intelligence were informed that the Germans were constructing pontoon bridges partially—about halfway—over the Our River on the Luxembourg-German border[citation needed] through aerial reconnaissance. The French military attaché in the Swiss capital—Berne—warned that the centre of the German assault would come on the Meuse at Sedan, sometime between 8 and 10 May. The report was dated 30 April. These reports had little effect on Gamelin.[56] [edit] German forces and dispositionsFurther information: Order of Battle for the Battle of France [edit] StrengthGermany had mobilised 4,200,000 men of the Heer, 1,000,000 of the Luftwaffe, 180,000 of the Kriegsmarine, and 100,000 of the Waffen-SS. When consideration is made for those in Poland, Denmark and Norway, the Army had 3,000,000 men available for the offensive on 10 May 1940.[57] These manpower reserves were formed into 157 divisions. Of these, 135 were earmarked for the offensive, including 42 reserve divisions.[58] The German forces in the West in May and June deployed some 2,439 tanks and 7,378 artillery guns, including matériel reserves committed.[59] In 1939–40, 45% of the army was at least 40 years old, and 50% of all the soldiers had just a few weeks training.[60] Contrary to what the blitzkrieg legend suggests, the German Army was not fully motorised. Just 10% of the Army was motorised in 1940 and could muster only 120,000 vehicles, compared to the 300,000 of the French Army. The British also had an "enviable" contingent of motorised forces.[60] Most of the German logistical tail consisted of horse-drawn vehicles.[61] Only 50% of the German divisions available in 1940 were combat ready,[60] often being more poorly equipped than their equivalents in the British and French Armies, or even as well as the German Army of 1914.[62] In the spring of 1940, the German army was semi-modern. A small number of the best-equipped and "elite divisions were offset by many second and third rate divisions".[62] [edit] Army operational deploymentThe German Army was divided into three army groups. Army Group A commanded by Gerd von Rundstedt, composed of 45½ divisions including seven armoured, was to execute the decisive movement, cutting a "Sichelschnitt"—not the official name of the operation but the translation in German of a phrase after the events coined by Winston Churchill[63] as "Sickle Cut" (and even earlier "armoured scythe stroke"—through the Allied defences in the Ardennes. It consisted of three armies: the 4th, 12th and 16th. It had three Panzer corps; one, the XV, had been allocated to the 4th Army, but the other two, the XXXXI (Reinhardt) and the XIX (Guderian) were united with the XIV Army Corps of two motorised infantry divisions, on a special independent operational level in Panzergruppe Kleist (officially known as XXII Corps).[64] Army Group B under Fedor von Bock, composed of 29½ divisions including three armoured, was tasked with advancing through the Low Countries and luring the northern units of the Allied armies into a pocket. It consisted of the 6th and 18th Armies. Army Group C, composed of 18 divisions under Wilhelm Ritter von Leeb, was charged with preventing a flanking movement from the east, and with launching small holding attacks against the Maginot Line and the upper Rhine. It consisted of the 1st and 7th Armies.[65] [edit] CommunicationsThe real trump card for the Germans was the radio.[66] The Panzers all had radios that allowed voice communication with other units. This enabled German armour to respond rapidly to a constantly changing battlefield situation. It allowed for last minute changes in tactics and improvisations to be formed far more quickly than the enemy. Some commanders regarded the ability to communicate the primary method of combat.[66] Radio drills were even considered more important than firing accurately.[66] Communication allowed German armour to coordinate their formations, bringing them together for a mass firepower effect in the attack or defence. This offset the French advantage in numbers and equipment, which was deployed in "penny-packets". The French also lacked radios and orders were passed from mouth to mouth. The opposing systems would give the Germans a decisive edge in battle.[66] The radio network went beyond tank to tank commands. The system also permitted a degree of communication between air and ground forces. Attached to Panzer Division was the Fliegerleittruppen (tactical air control troops) which were given wheeled vehicles.[66] There were too few Sd.Kfz. 251 command vehicles to make this a uniform facility throughout the army, but the theory allowed the army in some circumstances to call upon the Luftwaffe units, while either on the ground or airborne, to support an attack that army artillery could not deal with. It is said that Guderian’s Corps' dash to the channel never had to wait more than 15–20 minutes after making such a call, for the Luftwaffe to appear over the target.[66] A specific Junkers Ju 87 group (VIII. Fliegerkorps), which was to support the dash to the channel should Army Group A break through in the Ardennes, kept one Ju 87 and one fighter group ready for immediate take-off. On average, they could arrive to support armoured units within 45–75 minutes of orders being issued.[67] [edit] Army tacticsThe main tool of the German land forces was combined arms combat. In contrast to the Allies, they relied in highly mobile offensive units, with balanced numbers of well trained artillery, infantry, engineer and tank formations, all integrated into Panzer divisions. They relied on excellent communication systems which enabled them to break into a position and exploit it before the enemy could react. Panzer divisions could carry out reconnaissance missions, advance to contact, defend and attack vital positions or weak spots. This ground would then be held by infantry and artillery as pivot points for further attacks. Although their tanks were not designed for tank versus tank combat, they could take ground and draw the enemy armour on to the division's anti-tank lines. This conserved the tanks to achieve the next stage of the offensive. The units' logistics were self-contained, allowing for three or four days of combat. The Panzer divisions would be supported by motorised and infantry divisions.[68] The German Army lacked a formidable heavy combat tank such as the French possessed. In armament and armour, French tanks were the stronger designs and more numerous (although the German vehicles were faster and more mechanically reliable).[69][70] But while the German Army was outnumbered in artillery and tanks, it possessed some critical advantages over its opponents. The newer German Panzers had a crew of five men; a Commander, gunner-aimer, loader, driver and mechanic.[66] Having a trained individual for each task allowed each man to dedicate himself to his own mission and it made for a highly efficient combat team. The French had fewer members, with the commander double-tasked with loading the main gun, distracting him from his main duties in observation and tactical deployment. It made for a far less efficient system.[66] Even within infantry formations, the Germans enjoyed an advantage through the doctrine of Auftragstaktik (Mission command tactics), by which officers were expected to use their initiative to achieve their commanders' intentions, and were given control of the necessary supporting arms.[71] [edit] LuftwaffeOne of the German strengths was the Luftwaffe. It divided its forces into two groups. In total, 1,815 combat, 487 Transport and 50 Glider aircraft were deployed to support Army Group B, while a further 3,286 combat aircraft were deployed to support Army Groups A and C.[72] The task of German aviation was to provide close air support in the form of the dive-bomber and medium bomber. In 1940, the Luftwaffe was a broadly based force with no constricting central doctrine, other than its resources should be used generally to support national strategy. It was flexible and it was able to carry out both operational, tactical and strategic bombing effectively. Flexibility was the Luftwaffe's strength in 1940. While Allied air forces, in 1940, were tied to the support of the army, the Luftwaffe deployed its resources in a more general, operational way. It switched from air superiority missions, to medium-range interdiction, to strategic strikes, to close support duties depending on the need of the ground forces. In fact, far from it being a dedicated Panzer spearhead arm, less than 15% of the Luftwaffe was designed for close support of the army in 1939,[73] as this aspect was not its primary mission.[74] [edit] Anti-aircraft defencesIt is generally supposed that the Germans also had a major advantage in anti-aircraft guns, or Flak. In reality, the generally cited figure of 2,600 88 mm (3.46 in) heavy Flak guns and 6,700 37 mm (1.46 in) and 20 mm (0.79 in) light Flak seems to refer to the German armed forces total inventory, including the anti-aircraft defences of Germany's cities and ports and the equipment of training units.(A 9,300-gun Flak component with the field army would have involved more troops than the entire British Expeditionary Force) The actual provision of Flak for the invading forces was 85 heavy and 18 light batteries belonging to the Luftwaffe, 48 'companies' of light Flak integral to divisions of the army, and 20 'companies' of light Flak allocated as army troops that is, as a disposable reserve in the hands of HQs above corps level: altogether about 700 88 mm (3.46 in) and 180 37 mm (1.46 in) guns manned by Luftwaffe ground units and 816 20 mm (0.79 in) guns manned by the army.[75] [edit] Allied forces and dispositions[edit] StrengthDue to a low birthrate, which had declined during the First World War and the Great Depression, France had a severe manpower shortage relative to its total population, which was barely half of Germany. To compensate, France had mobilized about one-third of the male population between the ages of 20 and 45, bringing the strength of its armed forces to 5,000,000.[76] Only 2,240,000 of these served in army units in the north. The British contributed a total strength of 897,000 men in 1939, rising to 1,650,000 by June 1940. In May, it numbered only 500,000 men, including reserves. Dutch and Belgian manpower reserves amounted to 400,000 and 650,000 respectively.[57] [edit] ArmiesThere were 117 French divisions in total, of which 104 divisions (including 11 in reserve) were for the defence of the north. The British Army contributed only 13 divisions, three of which had not been organised when the campaign began. Some 22 Belgian, 10 Dutch and two Polish divisions[77] were also a part of the Allied order of battle. British artillery strength amounted to 1,280 guns. Belgium fielded 1,338 and the Dutch, 656. France had 10,700 pieces. This made a total of around 14,000 artillery pieces.[58] Although the Belgians, British and Dutch had barely any armour, the French had a powerful force of 3,254 tanks.[78] The French Army was of mixed quality. It had in its order of battle some formidable units, particularly the light and heavy armoured divisions (DCR and DLM), and several professional infantry divisions. However, a lot of divisions were composed of reserve soldiers, above 30 years old, and were ill-equipped. A serious qualitative deficiency was a lack of anti-air artillery, mobile anti-tank artillery and radio communication systems.[76] This was despite the efforts of Gamelin to produce mobile artillery units.[79] French tactical deployment and the use of mobile units operationally was also inferior to that of the Germans.[76] Tactically, armour was spread thinly along the French line: French infantry divisions were supported by tank battalions of about 100 tanks, which prevented them from being a strong, independent operational force. Making matters worse, only a handful of French tanks in each unit had radios installed, making communication difficult, most of them being unreliable.[76] French tanks were also very slow in speed in comparison to the Panzers (except for the Somua S-35), as they were designed as infantry support, enabling German tanks to offset their disadvantages by outmanoeuvring the French on the battlefield. In 1940, French military theoreticians still considered tanks as infantry support. As a consequence, at various points in the campaign, the French were not able to react as quickly as German armour.[76] In operational terms, the French did not seem to give much thought to armoured units as offensive weapons. Although some people such as Colonel de Gaulle tried during the 1930s to convince French High Command of the necessity to form armoured divisions supported by aviation and infantry, military conservatism prevented these "new ideas" from emerging. The French High Command was still obsessed with holding the front as it had in 1914-1918. The state of training was also unbalanced, with the majority of personnel trained only to man static fortifications.[80] Little training for mobile actions were carried out between September 1939 and May 1940.[81] DeploymentThe French forces in the north had three Army Groups. The 2nd and 3rd Army Groups defended the Maginot Line to the east; the 1st Army Group under Gaston-Henri Billotte was situated in the west and would execute the movement forward into the Low Countries. Initially positioned on the left flank near the coast, the French 7th Army, reinforced by a light mechanised (armoured) division (Division Légère Mécanisée, or DLM), was intended to move to the Netherlands via Antwerp. Next to the south were the divisions of the British Expeditionary Force (BEF), which would advance to the Dyle Line and position itself to the right of the Belgian army, from Louvain to Wavre. The French 1st Army, reinforced by two light mechanised divisions and with a "reserve armoured division" (DCR) in reserve, would defend the Gembloux Gap between Wavre and Namur. The southernmost army involved in the move forward into Belgium was the French 9th Army, which had to cover the entire Meuse sector between Namur and Sedan. The French 2nd Army would form the "hinge" of the movement and remain entrenched.[82] It was to face the concentration of the elite German armoured divisions attack at Sedan. It was given low priority in manpower, anti-aircraft and anti-tank weapons and air support, and consisted of just five divisions. Two of these were over-age reservist units, or "Serie B" divisions, and one was a West African unit from Senegal.[83] They had to cover a considerably larger front than they should have, considering their training and equipment, and thus formed the weak point of the French defence system. This stemmed from the French High Command's belief that the Ardennes forest was impassable to tanks, even though intelligence from the Belgian army and from their own intelligence services warned them of long armour and transport columns crossing the Ardennes and being stuck in a huge traffic-jam for some time. The French High Command simply refused to believe this was of any importance, as it did not suit their convictions on the matter. [edit] Air forcesIn the air, the Allies were numerically inferior: the French Armee de l'Air had 1,562 aircraft, and RAF Fighter Command committed 680 machines, while RAF Bomber Command could contribute some 392 aircraft to operations.[84] Most of the Allied aircraft were obsolete types, such as the Morane-Saulnier M.S.406. In the fighter force, only the British Hawker Hurricane and the French Dewoitine D.520 could contend with the German Messerschmitt Bf 109, the D.520 having better manoeuvrability although being slightly slower.[85] Unfortunately, on 10 May 1940, only 36 D.520 fighters had been dispatched, all to one squadron. In fighter aircraft, the Allies had the numerical advantage; 836 German Bf 109s against 81 Belgian, 261 British and 764 French fighters of various types. The French and British also had larger aircraft reserves.[86] In early June 1940, the French aviation industry had reached a considerable output, with an estimated matériel reserve of nearly 2,000 aircraft. However, a chronic lack of spare parts crippled this fleet. Only 29% (599) of the aircraft were serviceable, of which 170 were bombers.[87] Low serviceability meant the Germans had a clear numerical superiority in medium bomber aircraft.[86] [edit] Anti-aircraft defencesIn addition to 580 13 mm (0.5 in) machine guns assigned to civilian defence, the French Army had 1,152 25 mm (0.98 in) anti-aircraft guns, with 200 20 mm (0.79 in) autocannons in the process of delivery, and 688 75 mm (2.95 in) guns and 24 90 mm (3.54 in) guns, the latter having problems with barrel wear. There were also 40 First World War-vintage 105 mm (4.1 in) anti-aircraft guns available.[88] The BEF had 10 regiments of 3.7 in (94 mm) guns, then the most advanced heavy anti-aircraft weapon in the world, and seven and a half regiments of 40 mm (1.57 in) Bofors: with either three or four batteries per regiment, this represented roughly 300 heavy and 350 light AA guns.[89] The Belgians had two heavy anti-aircraft regiments and were in the process of introducing 40 mm (1.57 in) Bofors guns as equipment for divisional anti-aircraft troops. The Dutch had 84 75 mm (2.95 in), 39 elderly 60 mm (2.36 in), seven 100 mm (3.9 in), and 232 20 mm (0.79 in) and 40 mm (1.57 in) anti-aircraft guns, and several hundred First World War-vintage Spandau M.25 machine guns on anti-aircraft mountings.[75] [edit] Fall Gelb[edit] Northern frontGermany initiated Fall Gelb on the evening prior to and the night of 10 May. During the late evening of 9 May, German forces occupied Luxembourg.[90] Army Group B launched its feint offensive during the night into the Netherlands and Belgium. During the morning of 10 May, Fallschirmjäger (paratroopers) from the 7th Flieger and 22. Luftlande Infanteriedivision under Kurt Student executed surprise landings at The Hague, on the road to Rotterdam and against the Belgian fort at Eben-Emael in order to facilitate Army Group B's advance.[91] The French command reacted immediately, sending its 1st Army Group north in accordance with Plan D. This move committed their best forces, diminishing their fighting power by the partial disorganisation it caused and their mobility by depleting their fuel stocks.[92] By the time the French 7th Army crossed the Dutch border, they found the Dutch already in full retreat, and withdrew into Belgium to protect Brussels.[93] [edit] The NetherlandsMain article: Battle of the Netherlands
A burnt out German Junkers Ju 52 transport lying in a Dutch field. The Luftwaffe was guaranteed air superiority over the Netherlands by sheer numerical superiority. They allocated 247 medium bombers, 147 fighter aircraft, 424 Junkers Ju 52 transports, and 12 Heinkel He 59 seaplanes to operations over the Netherlands.[94] The Dutch Air Force, the Militaire Luchtvaartafdeling (ML), had a strength of 144 combat aircraft, half of which were destroyed within the first day of operations.[95] The remainder was dispersed and accounted for only a handful of Luftwaffe aircraft shot down. In total the ML flew a mere 332 sorties, losing 110 of its aircraft.[96] The German 18. Armee secured all the strategically vital bridges in and toward Rotterdam, which penetrated Fortress Holland and bypassed the New Water Line from the south. However, an operation organised separately by the Luftwaffe to seize the Dutch seat of government, known as the Battle for The Hague, ended in complete failure.[97] The airfields surrounding the city (Ypenburg, Ockenburg, and Valkenburg) were taken with heavy casualties and transport aircraft losses. Some 96 aircraft in all were lost to Dutch shell fire.[97] The Luftwaffe''s Transportgruppen operations had cost it 125 Ju 52s destroyed and 47 damaged, representing 50% of the fleet's strength.[98] Moreover, the airborne operation had cost the German paratroopers 4,000 men, of whom 1,200 were prisoners of war, out of 8,000. The Dutch evacuated them back to Britain. The total percentage cost of the defeat was 20% of NCOs and men and 42% of German officers were lost.[95] The French 7th Army failed to block the German armoured reinforcements from the 9. Panzerdivision, which reached Rotterdam on 13 May. That same day in the east, following the Battle of the Grebbeberg in which a Dutch counter-offensive to contain a German breach had failed, the Dutch retreated from the Grebbe line to the New Water Line. The Dutch Army, still largely intact, surrendered in the evening of 14 May after the Bombing of Rotterdam by the Luftwaffe. Heinkel He 111 medium bombers of Kampfgeschwader 54 (Bomber Wing 54) destroyed the centre of the city, an act which has remained controversial. The Dutch Army considered its strategic situation to have become hopeless and feared further destruction of the major Dutch cities. The capitulation document was signed on 15 May. However, Dutch forces continued fighting in Zeeland and the colonies while Queen Wilhelmina established a government in exile in Britain.[99] Dutch casualties amounted to 2,157 army, 75 air force, and 125 Navy personnel. 2,559 civilians were also killed.[93] [edit] Invasion of BelgiumMain article: Battle of Belgium
Abandoned Belgian tank is inspected by two German soldiers The Germans were able to establish air superiority in Belgium. Having completed thorough photographic reconnaissance missions, they destroyed 83 of the 179 aircraft of the Aeronautique Militaire within the first 24 hours. The Belgians would fly 77 operational missions but would contribute little to the air campaign. The Luftwaffe was assured air superiority over the Low Countries.[94] Because Army Group B had been so weakened compared to the earlier plans, the feint offensive by the German 6. Armee was in danger of stalling immediately, since the Belgian defences on the Albert Canal position were very strong.[100] The main approach route was blocked by Fort Eben-Emael, a large fortress then generally considered the most modern in Europe,[100] controlling the junction of the Meuse and the Albert Canal.[101] Any delay might endanger the outcome of the entire campaign, because it was essential that the main body of Allied troops was engaged before Army Group A established bridgeheads. To overcome this difficulty, the Germans resorted to unconventional means in the assault on the fort. In the early hours of 10 May, DFS 230 gliders landed near the fort and unloaded assault teams that disabled the main gun cupolas with hollow charges.[102] The bridges over the canal were seized by German paratroopers. The Belgians launched considerable counter attacks which were broken up by the Luftwaffe.[103] Shocked by a breach in its defences just where they had seemed the strongest, the Belgian Supreme Command withdrew its divisions to the KW-line five days earlier than planned. Similar operations against the bridges in the Netherlands, at Maastricht, failed. All were blown up by the Dutch and only one railway bridge was taken.[104] This stalled the German armour on Dutch territory for a time.[105] The BEF and the French First Army were not yet entrenched, and the news of the defeat on the Belgian border was unwelcome. The Allies had been convinced Belgian resistance would have given them several weeks to prepare a defensive line at the Gembloux Gap.[106] When General Erich Hoepner's XVI Panzerkorps, consisting of 3rd and 4th Panzer Divisions, was launched over the newly-captured bridges in the direction of the Gembloux Gap, this seemed to confirm the expectations of the French Supreme Command that the German Schwerpunkt would be at that point. Gembloux was located between Wavre and Namur, on flat, ideal tank terrain. It was also an unfortified part of the Allied line. In order to gain time to dig in there, René Prioux, commanding the Cavalry Corps of the French 1st Army, sent two French Light Mechanised divisions, the 2nd DLM and 3rd DLM, forward to meet the German armour at Hannut, east of Gembloux. They would provide an advanced guarding screen which would stall the Germans and allow sufficient time for the French 1st Army to dig into formidable positions.[107] [edit] Battle of Hannut and GemblouxThe resulting Battle of Hannut, which took place on 12–13 May, was the largest tank battle until that date, with about 1,500 armoured fighting vehicles participating.[108] The French disabled about 160 German tanks for the loss of 91 Hotchkiss H35 and 30 Somua S35 tanks destroyed or captured.[109][110] The Germans controlled the battlefield after a voluntary French withdrawal. They recovered and eventually repaired or rebuilt many of their knocked-out tanks[111] so German irreparable losses amounted to just 49 tanks (20, 3rd Panzer and 29, 4th Panzer).[112] Prioux had achieved his mission in stalling the Panzers and allowing the French 1st Army to settle, so it was a tactical victory for the French.[113][114] By contrast, although Hoepner had succeeded in diverting the French First Army from Sedan, which was his most important mission, he failed to destroy or forestall it. The French would escape the encirclement and still render invaluable support to the British Army in Dunkirk just two weeks later.[115] On 14 May, having been tactically defeated at Hannut, Hoepner tried to break the French line again, against orders, leading to The Battle of the Gembloux Gap.[116] This was the only time in the campaign when German armour frontally attacked a strongly held fortified position. The attempt was repelled by the 1st Moroccan Infantry Division, costing 4. Panzerdivision another 42 tanks, 26 of which were irreparable. This French defensive success was made irrelevant by events further south.[117] Following the battle with the French 1st Army on 15 May, the war diary of the 4. Panzerdivision noted irreparable losses that day of nine Panzer Is, nine Panzer IIs, six Panzer IIIs, eight Panzer IVs, and two command tanks; of an original total of 314. 137 machines, of which 20 were mk IIIs and four were mk IVs, remained combat-ready. [edit] Central front[edit] Belgian and French Ardennes
The German advance until noon, 16 May 1940 In the centre, the progress of German Army Group A was to be delayed by Belgian motorised infantry and French mechanised cavalry divisions (Divisions Légères de Cavalerie) advancing into the Ardennes. The main resistance came from the Belgian 1st Chasseurs Ardennais along with the 5th French Light Cavalry Division (DLC).[118] These forces had insufficient anti-tank capacity to block the surprisingly large number of German tanks they encountered and quickly gave way, withdrawing behind the Meuse. The German advance was greatly hampered by the sheer number of troops trying to force their way along the poor road network. Kleist′s Panzergruppe had more than 41,000 vehicles.[119] This huge armada had been allocated only four march routes through the Ardennes.[119] The time-tables proved to be wildly optimistic and there was soon heavy congestion, beginning well over the Rhine to the east, which would last for almost two weeks. This made Army Group A very vulnerable to French air attacks, but these did not materialise.[119] Although Gamelin was well aware of the situation, the French bomber force was far too weak to challenge German air superiority so close to the German border. The French had tried in vain to stem the flow of the German armour during the Battle of Maastricht, and failed with heavy losses. In two days, the bomber force had been reduced to 72 out of 135.[120] On 11 May, Gamelin had ordered reserve divisions to begin reinforcing the Meuse sector. Because of the danger the Luftwaffe posed, movement over the rail network was limited to night-time, slowing the reinforcement, but the French felt no sense of urgency as they believed the build-up of German divisions would be correspondingly slow. The French Army did not conduct river crossings unless assured of heavy artillery support. While they were aware that the German tank and infantry formations were strong, they were confident in their strong fortifications and artillery superiority. However, the quality of the fighting men was dubious.[121] The German advance forces reached the Meuse line late in the afternoon of 12 May. To allow each of the three armies of Army Group A to cross, three major bridgeheads were to be established at: Sedan in the south, Monthermé to the northwest and Dinant further to the north.[122] The first German units to arrive hardly had local numerical superiority; their already insufficient artillery support was further limited by an average supply of just 12 rounds per gun.[123] Fortunately for the German divisions, the French artillery was also limited to a daily combat supply rate of 30 rounds per "tube" (gun).[124] [edit] Battle of SedanMain articles: Battle of Sedan (1940) and Luftwaffe Organization
Renault R35 moving to the front towards Sedan. At Sedan, the Meuse Line consisted of a strong defensive belt 6 km (3.7 mi) deep, laid out according to the modern principles of zone defence on slopes overlooking the Meuse valley and strengthened by 103 pillboxes, manned by the 147th Fortress Infantry Regiment. The deeper positions were held by the 55th Infantry Division. This was only a grade "B" reserve division. On the morning of 13 May, the 71st Infantry Division was inserted to the east of Sedan, allowing 55th Infantry to narrow its front by one-third and deepen its position to over 10 km (6.2 mi). Furthermore, it had a superiority in artillery to the German units present.[123] On 13 May, the German XIX Korps forced three crossings near Sedan, executed by the 1., 2. and 10. Panzerdivisions, reinforced by the elite Großdeutschland infantry regiment. Instead of slowly massing artillery as the French expected, the Germans concentrated most of their air power (as they lacked strong artillery forces) to smash a hole in a narrow sector of the French lines by carpet bombing and by dive bombing. Hermann Göring had promised Guderian that there would be extraordinarily heavy air support during a continual eight hour air attack, from 08:00am until dusk.[125] The Luftwaffe executed the heaviest air bombardment the world had yet witnessed and the most intense by the Germans during the war.[126] The Luftwaffe committed two Sturzkampfgeschwader (Dive Bomber Wings) to the assault, flying 300 sorties against French positions.[127] A total of 3,940 sorties were flown by nine Kampfgeschwader (Bomber Wings).[128] Some of the forward pillboxes were unaffected, and repulsed the crossing attempts of the 2. and 10. Panzerdivisions. However, it transpired the morale of the deeper units of the 55th Infantry had been broken by the impact of the air attacks. The French supporting artillery batteries had fled. At a cost of a few hundred casualties, the German infantry had penetrated up to 8 km (5.0 mi) into the French defensive zone by midnight.[129] Even by then, most of the infantry had not crossed, much of the success being due to the actions of just six platoons, mainly assault engineers.[130] The disorder that had begun at Sedan spread down the French lines. At 19:00 on 13 May, the 295th regiment of 55th Infantry Division, holding the last prepared defensive line at the Bulson ridge 10 km (6.2 mi) behind the river, was panicked by the false rumour that German tanks were already behind its positions. It fled, creating a gap in the French defences, before even a single German tank had crossed the river. This "Panic of Bulson" also involved the divisional artillery. The Germans had not attacked their position, and would not do so until 12 hours later, at 07:20 on 14 May.[131] Still, the French had several hours to launch a counter offensive before the Germans consolidated the bridgeheads, but failed to attack soon enough.[132] Recognising the gravity of the defeat at Sedan, General Gaston-Henri Billotte, commander of the 1st Army Group, whose right flank pivoted on Sedan, urged that the bridges across the Meuse be destroyed by air attack, convinced that "over them will pass either victory or defeat!".[128] That day, every available Allied light bomber was employed in an attempt to destroy the three bridges, but failed to hit them while suffering heavy losses. Some 44% of the Allies' bomber strength was destroyed.[128][133] [edit] Collapse of the Meuse front
Rommel in 1940. Both Rommel and Guderian ignored the OKW directives to halt after breaking out of the Meuse bridgeheads. The decision proved crucial to the German success. Heinz Guderian, the commander of the German XIX. Armeekorps, had indicated on 12 May that he wanted to enlarge the bridgehead to at least 20 km (12 mi). His superior, Ewald von Kleist, ordered him on behalf of Hitler to limit his moves to a maximum of 8 km (5.0 mi) before consolidation. At 11:45 on 14 May, von Rundstedt confirmed this order, which implied that the tanks should now start to dig in.[134] Guderian was able to get to Ewald von Kleist to agree to "reconnaissance in force", by threatening to resign and behind the scenes interventions.[135] This vague terminology allowed Guderian to move forward, effectively ignoring Ewald von Kleist's order to halt.[135] In the original von Manstein Plan as Guderian had suggested, secondary attacks would be carried out to the southeast, in the rear of the Maginot Line, to confuse the French command. This element had been removed by Halder but Guderian now sent the 10th Panzerdivision and Großdeutschland infantry regiment south to execute precisely such a feint attack,[136] using the only available route south over the Stonne plateau. The commander of the French 2nd Army, General Charles Huntziger, intended to carry out a counterattack at the same spot by the armoured 3e Division Cuirassée de Réserve (DCR) to eliminate the bridgehead. This resulted in an armoured collision, both parties trying in vain to gain ground in furious attacks from 15–17 May, the village of Stonne changing hands many times. Huntzinger considered this at least a defensive success and limited his efforts to protecting his flank. Holding Stonne and taking Bulson would have enabled the French to hold onto the high ground overlooking Sedan. They could disrupt the Sedan bridgehead, even if they could not take it. Heavy battles took place and Stonne changed hands 17 times. However, on the evening of 17 May, it fell to the Germans for the last time.[137] Meanwhile, Guderian had turned his other two armoured divisions, the 1. and 2. Panzerdivisions, sharply to the west on 14 May. They began to advance at speed to the English Channel.[138] On 15 May, in heavy fighting, Guderian's motorised infantry dispersed the reinforcements of the newly formed French 6th Army in their assembly area west of Sedan, undercutting the southern flank of the French 9th Army. The 9th Army collapsed, and surrendered en masse. The 102nd Fortress Division, its flanks unsupported, was surrounded and destroyed on 15 May at the Monthermé bridgehead[139] by the 6. and 8. Panzerdivisions acting without air support.[140] The French 2nd Army had also been seriously mauled and had rendered itself impotent. The 9th Army was giving way because they also did not have time to fortify their lines. Erwin Rommel had breached its defences within 24 hours of its conception.[139] This allowed the impetuous Rommel to break free with his 7. Panzerdivision, refusing to allow his division rest and advancing both by day and night. The Ghost division advanced 30 mi (48 km) in just 24 hours. Rommel's lines of communication with his superior, General Hermann Hoth, and his headquarters were cut. Disobeying orders and not waiting for the French to establish a new line of defence, he continued to advance north-west to Avesnes-sur-Helpe, just ahead of the 1. and 2. Panzerdivisions. Rommel was lucky, because the French 5th Motorised Infantry Division had set up its overnight bivouac in his path, leaving its vehicles neatly lined up along the roadsides. At this stage, Rommel's tanks dashed right through them. The slow speed, overloaded crews and lack of any means of communication in battle undid the French. The 5. Panzerdivision joined in the fight. The French did inflict significant losses on the division, but they could not cope with the speed of the German mobile units, which closed fast and dispatched the French armour at close range. During this battle, the remaining elements of the 1st DCR, resting after losing all but 16 of its tanks in Belgium, were also engaged and defeated. The French unit retreated, with just three remaining tanks. The 1st DCR was effectively destroyed on 17 May The Germans lost 50 out of 500 tanks in the battle. By 17 May, Rommel claimed to have taken 10,000 prisoners and suffered only 36 losses.[148] Guderian was delighted with the fast advance, and encouraged his XIX Korps, consisting of the 1., 2. and 10. Panzerdivisions to head for the channel, continuing until fuel was exhausted.[149] However, the success of his commanders on the ground began to have effects on Hitler who worried that the German advance was moving too fast. Halder recorded in his diary on 17 May that "Fuhrer is terribly nervous. Frightened by his own success, he is afraid to take any chance and so would pull the reins on us ... [he] keeps worrying about the south flank. He rages and screams that we are on the way to ruin the whole campaign."[135] Through deception and different interpretations of orders to stop from Hitler and von Kleist, the commanders on the ground were able to ignore Hitler's attempts to stop the northern advance to the sea.[135] [edit] Low French morale
The German advance up to 21 May 1940 The Panzerkorps now slowed their advance considerably and put themselves in a very vulnerable position. They were stretched out, exhausted, low on fuel, and many tanks had broken down. There was now a dangerous gap between them and the infantry. A determined attack by a fresh and large enough mechanised force might have cut the Panzers off and wiped them out.[citation needed] The French High Command, however, was reeling from the shock of the sudden offensive and was now stung by a sense of defeatism. On the morning of 15 May, French Prime Minister Paul Reynaud telephoned the new Prime Minister of the United Kingdom Winston Churchill and said "We have been defeated. We are beaten; we have lost the battle." Churchill, attempting to offer some comfort to Reynaud, reminded the Prime Minister of all the times the Germans had broken through the Allied lines in World War I only to be stopped. Reynaud was, however, inconsolable.[150] Churchill flew to Paris on 16 May. He immediately recognised the gravity of the situation when he observed that the French government was already burning its archives and was preparing for an evacuation of the capital. In a sombre meeting with the French commanders, Churchill asked General Gamelin, "Où est la masse de manoeuvre?" ["Where is the strategic reserve?"] that had saved Paris in the First World War. "Aucune" ["There is none"] Gamelin replied. After the war, Gamelin claimed his response was "There is no longer any."[151] Churchill described hearing this later as the single most shocking moment in his life. Churchill asked Gamelin where and when the general proposed to launch a counterattack against the flanks of the German bulge. Gamelin simply replied "inferiority of numbers, inferiority of equipment, inferiority of methods".[152] [edit] Failed Allied counter-attacksSome of the best Allied units in the north had seen little fighting. Had they been kept in reserve they might have been used in a decisive counter-strike. In a twist of irony, pre-war General Staff Studies had asserted the main reserves were to be kept on French soil, to resist an invasion of the Low Countries, deliver a counter attack or "re-establish the integrity of the original front".[153] Despite having a numerically superior armoured force, the French failed to use it properly, or to deliver an attack on the vulnerable German bulge. The Germans combined their fighting vehicles in major, operational formations and used them at the point of main effort. The bulk of French armour was scattered along the front in tiny formations. Most of the French reserve divisions had by now been committed. The 1st DCR had been wiped out when it had run out of fuel and the 3rd DCR had failed to take its opportunity to destroy the German bridgeheads at Sedan.[154] The only armoured division still in reserve, 2nd DCR, was to attack on 16 May west of Saint-Quentin, Aisne. The division's commander could locate only seven of its 12 companies, which were scattered along a 49 × 37 mi (79 × 60 km) front. The formation was overrun by the 8. Panzerdivision while still forming up and was effectively destroyed as a fighting unit.[155] Colonel Charles de Gaulle, in command of France's hastily formed 4th DCR, attempted to launch an attack from the south at Montcornet where Guderian had his Korps headquarters and the 1. Panzerdivision had its rear service areas. The Germans hastily improvised a defence while Guderian rushed up the 10. Panzerdivision to threaten De Gaulle's flank. This flank pressure and attacks by the Luftwaffe's VIII Fliegerkorps broke up the attack. French losses on 17 May were 32 tanks and armoured vehicles, but had "inflicted loss on the Germans".[156] On 19 May, after receiving reinforcements, De Gaulle made another effort, and was repulsed with the loss of 80 of 155 vehicles.[157] von Richthofen's Fliegerkorps VIII had done most of the work, by targeting French units moving into position to attack the vulnerable German flanks it was able to stop most counter attacks from starting. The defeat of de Gaulle's unit and the disintegration of the French 9th Army was caused mainly by Richthofen's air units.[158] Although De Gaulle had achieved a measure of success, his attacks on 17 and 19 May did not significantly alter the overall situation. It was the only French counter-attack on the German forces advancing to the channel.[159] [edit] German spearheads reach the ChannelThe Allies did little to either threaten the Panzerkorps or to escape from the danger that they posed. The Panzer troops used 17–18 May to refuel, eat, sleep and return more tanks to working order. On 18 May, Rommel caused the French to give up Cambrai by merely feinting an armoured attack toward the city. On 19 May, General Edmund Ironside, the British Chief of the Imperial General Staff, conferred with General Lord Gort, commander of the BEF, at his headquarters near Lens. He urged Gort to save the BEF by attacking south-west toward Amiens. Gort replied that seven of his nine divisions were already engaged on the Scheldt River, and he had only two divisions left with which he would be able to mount such an attack. Ironside then asked Gort under whose command he was acting. Gort replied that this was General Billotte, the commander of the French 1st Army Group, but that Billotte had issued no orders for eight days. Ironside confronted Billotte, whose own headquarters was nearby, and found him apparently incapable of taking decisive action. He returned to Britain concerned that the BEF was already doomed, and ordered urgent anti-invasion measures.[160] The German land forces could not remain inactive any longer since it would allow the Allies to reorganise their defence or escape. On 19 May, Guderian was permitted to start moving again and smashed through the weak British 18th and 23rd Territorial Divisions located on the Somme river. The German units occupied Amiens and secured the westernmost bridge over the river at Abbeville. This move isolated the British, French, Dutch, and Belgian forces in the north.[161] On 20 May, a reconnaissance unit from Rudolf Veiel′s 2. Panzerdivision reached Noyelles-sur-Mer, 100 kilometres (62 mi) to the west of their positions on the 17th. From there, they were able to see the Somme estuary and the English Channel. A huge pocket, containing the Allied 1st Army Group (the Belgian, British, and French 1st, 7th and 9th Armies), was created.[162] VIII. Fliegerkorps, under the command of Wolfram von Richthofen, covered the dash to the channel coast. Heralded as the Ju 87s′ (Stuka) "finest hour", these units responded via an extremely efficient communications system to the Panzer Divisions′ every request for support, which effectively blasted a path for the Army.[163] The Ju 87s were particularly effective at breaking up attacks along the flanks of the German forces, breaking fortified
| World War II: Axis Invasions and the Fall of France In the spring of 1940, an emboldened Germany asserted itself as a modern conqueror of nations, successfully invading and occupying six countries in fewer than 100 days. On April 9, 1940, Germany invaded Denmark, which capitulated in a mere six hours. At the same time, Nazi warships and troops were entering Norwegian waters, attacking ships, landing troops, and starting a conflict that would last for two months. On May 10, more than 2 million German troops on land and in the air invaded France, Belgium, Luxembourg, and the Netherlands using blitzkrieg tactics. The smaller countries fell within weeks, but France held on until June 22, when it signed an armistice with Germany. Also during this period, the Soviet Union initiated staged elections in Estonia, Latvia, and Lithuania, forcefully annexing them. By the end of the summer, German forces were digging in, building up, and planning for the Battle of Britain.
A German armored tank crosses the Aisne River in France, on June 21, 1940, one day before the surrender of France. (AP Photo) Waves of German paratroopers land on snow-covered rock ledges in the Norwegian port and city of Narvik, during the German invasion of the Scandinavian country. (AP Photo) # The remains of a naval battle in Narvik, Norway in 1940. Several battles between German and Norwegian forces took place in the Ofotfjord in the spring of 1940. (LOC) # A group of German Gebirgsjägers (mountain troops) in action in Narvik, Norway, in 1940. (Deutsches Bundesarchiv/German Federal Archive) # German soldiers move through a burning Norwegian village, in April 1940, during the German invasion. (AP Photo) # Members of a British Royal Air Force bombing squadron hold thumbs up on April 22, 1940, as they return to home base from an attack on German warships off Bergen, Norway. (AP Photo) # An aircraft spotter on the roof of a building in London, England, with St. Paul's Cathedral in the background. (National Archives) # German bombs miss their targets and explode in the sea during an air raid on Dover, England, in July 1940. (AP Photo) # Members of the Black Watch, one of the famed Scottish regiments, undergo rough training in South Coast sector of England, in 1940. The men were training to be combat parachutists. (AP Photo) # The Royal Irish Fusiliers of the British expeditionary forces come to the aid of French farmers whose horses have been commandeered by the French Army. A tank is hitched to a plow to help with the spring tilling of the soil on March 27, 1940. (AP Photo) # Belgian women tearfully have goodbye to husbands and sons leaving for the front line as the threat of invasion hung heavily over their homeland, on May 11, 1940. (AP Photo) # A formation of German Ju 87 Stuka dive bombers are flying over an unknown location, in this May 29, 1940 photo. (AP Photo) # A German soldier operates his antiaircraft gun at an unknown location, in support of the German troops as they march into Danish territory, on April 9, 1940. (AP Photo) # Reconnaissance squads head the German advance into Luxembourg, on May 10, 1940. (AP Photo) # German parachute troops descending on Fort Eben Emael in Belgium, on May 30, 1940, part of a larger surprise attack. (AP Photo) # French soldiers load a piece of artillery in a wood somewhere in the Western Front on May 29, 1940. The shell will be fired into the Nazi-occupied sector of the soldiers' homeland. (AP Photo) # A formation of German Dornier Do 17Z light bombers, flying over France on June 21, 1940. (Deutsches Bundesarchiv/German Federal Archive) # German parachute troops man a machine gun post in the Netherlands, on June 2, 1940. This photo came from a camera found on German parachute troops who were taken prisoner. (AP Photo) # Belgians blasted this bridge across the Meuse River in the town of Dinant, Belgium, but shortly, a wooden bridge built by German sappers was standing next to the ruins, on June 20, 1940. (AP Photo) # A woman, fleeing from her home with the few possessions she can carry, takes cover behind a tree by the roadside, somewhere in Belgium, on May 18, 1940, during an aerial attack by Nazi planes. Her bicycle, with her belongings tied to it, rests against the tree, to which she clings for protection. (AP Photo) # Hundreds of thousands of British and French troops who had fled advancing German forces massed on the beach of Dunkirk, France, on June 4, 1940, awaiting ships to carry them to England. (AP Photo) # British and French troops wade through shallow water along the beach at Dunkirk, France on June 13, 1940 toward small rescue craft that will bring them to England. Some 700 private vessels joined dozens of military craft to ferry the men across the channel. (AP Photo) # Men of the British Expeditionary Force safely arrive home after their fight in Flanders on June 6, 1940. More than 330,000 soldiers were rescued from Dunkirk in the mission code-named Operation Dynamo. (AP Photo) # Oil tanks burn in Dunkirk, France, on June 5, 1940. The aircraft in the right foreground is an RAF Coastal Command Lockheed Hudson on patrol. (AP Photo) # Aftermath of the British retreat in Flanders, Belgium on July 31, 1940. English soldiers lie dead beside their vehicles. (AP Photo) # English and French prisoners of war sit near railroad tracks somewhere in Belgium in 1940. (Deutsches Bundesarchiv German Federal Archive) # German troops parade in Copenhagen, Denmark on April 20, 1940 to celebrate Hitler's birthday. (AP Photo) # Warning: Amsterdam, Netherlands. A Dutch father, who had been severely wounded in his head, hand, and leg, stares in horror at the mutilated corpse of his little girl 1940. (LOC) # Warning: A dead German soldier, one of the many thousands who fell during the invasions of 1940, somewhere in France, on June 9, 1940. (AP Photo) # French tanks pass through a bombarded French town on their way to the front line in France, on May 25, 1940. (AP Photo) # Women waving Union Jacks greet passing soldiers, all Canadians, as they march from the docks after disembarking in France on June 18, 1940. (AP Photo) # Some of the 350 refugee British children who arrived in New York City on July 8, 1940, aboard the British liner Samaria. They were the first large contingent of English children sent from the isles to be free of the impending Nazi invasion. (AP Photo/Becker) # German troops walk down a deserted street in Luxembourg, on May 21, 1940, with rifles, pistols and grenades ready to protect themselves. (AP Photo) # Bombs let loose by the Royal Air Force during a raid on Abbeville Aerodrome -- now held by Germans -- in France, on July 20, 1940. (AP Photo) # Refugees leave their ruined town in Belgium, after it had been bombed by the Germans, carrying what little of their personal belongings they managed to salvage, on May 19, 1940. (AP Photo) # Nazi motorcyclists pass through a destroyed town in France in 1940. (Deutsches Bundesarchiv/German Federal Archive) # A crowd of women, children and soldiers of the German Wehrmacht give the Nazi salute on June 19, 1940, at an unknown location in Germany. (AP Photo) # Warning: Civilian victims of a German air raid near Antwerp, Belgium, on June 13, 1940. British troops said these people were cycling to work when German planes swept over, attacking and leaving them to die beside a wheat field. (AP Photo) # British Prime Minister Winston Churchill inspects Britain's Grenadier guards standing at attention in front of Light Bren gun armored units in July, 1940. (AP Photo) # An allied soldier thrusts the plunger of an explosive mechanism that will blast a bridge to delay the Nazi advance, in the Leuven region of Belgium, on June 1, 1940, before this area fell to the Germans. (AP Photo) # A tandem bicycle carries a whole Belgian family of four with some of their belongings strapped to their backs, as they flee from the advancing Nazis into France, on June 14, 1940. (AP Photo) # Adolf Hitler poses in Paris with the Eiffel Tower in the background, one day after the formal capitulation of France, on June 23, 1940. He is accompanied by Albert Speer, German Reichsminister of armaments and Hitler's chief architect, left, and Arno Breker, professor of visual arts in Berlin and Hitler's favorite sculptor, right. An unknown cameraman seen in the foreground is filming the event. Photo provided by the German War Department. (AP Photo/German War Department) # French destroyer Mogador, in flames after being shelled during the British attack on Mers-el-Kebir, French Algeria, on July 3, 1940. After France signed an armistice with Germany, the British government moved to destroy what it could of the French Navy, trying to prevent the ships from falling into German hands. Several ships were badly damaged, one sunk, and 1,297 French sailors were killed in the attack. (Jacques Mulard/CC-BY-SA) # Heavy mortars of Hitler's Army are set in position under cliffs on the French side of the English Channel, at Fecamp, France, in 1940, as Germany occupied France and the low countries. (AP Photo) A German soldier stands in the tower of the cathedral, gazing down upon the captured French city of Strasbourg on July 15, 1940. Adolf Hitler visited the city in June of 1940, declaring plans for the Strasbourg Cathedral, stating that it should become a "national sanctuary of the German people." (AP Photo) # Soviet soldiers with lowered standards of the defeated Nazi forces during the Victory Day parade in Moscow, on June 24, 1945. (Yevgeny Khaldei/Waralbum.ru) #
Sudeten Germans make their way to the railway station in Liberec, in former Czechoslovakia, to be transferred to Germany in this July, 1946 photo. After the end of the war, millions of German nationals and ethnic Germans were forcibly expelled from both territory Germany had annexed, and formerly German lands that were transferred to Poland and the Soviet Union. The estimated numbers of Germans involved ranges from 12 to 14 million, with a further estimate of between 500,000 and 2 million dying during the expulsion. (AP Photo/CTK) #
An American G.I. places his arm around a Japanese girl as they view the surroundings of Hibiya Park, near the Tokyo palace of the emperor, on January 21, 1946. (AP Photo/Charles Gorry) #
General Charles de Gaulle (center) shaking hands with children, two months after the German capitulation in Lorient, France, in July of 1945. Lorient was the location of a German U-boat (submarine) base during World War II. Between January 14 and February 17, 1943, as many as 500 high-explosive aerial bombs and more than 60,000 incendiary bombs were dropped on Lorient. The city was almost completely destroyed, with nearly 90% of the city flattened. (AFP/Getty Images) #
The super transport ship, General W.P. Richardson, docked in New York, with veterans of the European war cheering on June 7, 1945. Many soldiers were veterans of the African campaign, Salerno, Anzio, Cassino and the winter warfare in Italy's mountains. (AP Photo/Tony Camerano) #
This aerial file photo shows a portion of Levittown, New York, in 1948 shortly after the mass-produced suburb was completed on Long Island farmland in New York. This prototypical suburban community was the first of many mass-produced housing developments that went up for soldiers coming home from World War II. It also became a symbol of postwar suburbia in the U.S. (AP Photo/Levittown Public Library, File) #
This television set, retailing for $100, is reportedly the first moderately priced receiver manufactured in quantity. Rose Clare Leonard watches the screen, which reproduces a 5x7 image, as she tunes in at the first public post-war showing at a New York department store, on August 24, 1945. Although television was invented prior to World War II, the war prevented mass production. Soon after the war, sales and production picked up, and by 1948, regular commercial network programming had begun. (AP Photo/Ed Ford) #
A U.S. soldier examines a solid gold statue, part of Hermann Goering's private loot, found by the 7th U.S. Army in a mountainside cave near Schonau am Konigssee, Germany, on May 25, 1945. The secret cave, the second found to date, also contained stolen priceless paintings from all over Europe. (AP Photo/Jim Pringle) #
In Europe, some churches have been completely ruined, but others still stand amid utter devastation. Munchengladbach Cathedral stands here in the rubble, though still in need of repairs, seen in Germany, on November 20, 1945. (AP Photo) # |


On December 7, 1941, the Imperial Japanese Navy launched a surprise attack on the United States, bombing warships and military targets in Pearl Harbor, Hawaii. More than 350 Japanese aircraft attacked the naval base in two waves, strafing targets, dropping armor-piercing bombs, and launching torpedoes toward U.S. battleships and cruisers. The U.S. forces were unprepared, waking to the sounds of explosions and scrambling to defend themselves. The entire preemptive attack lasted only 90 minutes, and in that time, the Japanese sunk four battleships and two destroyers, pummeled 188 aircraft, and damaged even more buildings, ships and airplanes. (Two of the battleships were later raised and returned to service.) Some 2,400 Americans were killed in the attack; another 1,250 were injured, and a huge shock was dealt to United States. After the attack, Japan officially declared war on the United States. The next day President Roosevelt delivered his famous "infamy" speech, and signed a formal declaration of war against the Empire of Japan. Within days, Nazi Germany and the Kingdom of Italy also declared war on the United States, and the U.S. reciprocated soon after.

The USS Shaw explodes after being hit by bombs during the Japanese surprise attack on Pearl Harbor, Hawaii, in this December 7, 1941 photo. (AP Photo, U.S. Navy) 
The USS Shaw explodes after being hit by bombs during the Japanese surprise attack on Pearl Harbor, Hawaii, in this December 7, 1941 photo. (AP Photo, U.S. Navy)

Japanese pilots get instructions aboard an aircraft carrier before the attack on Pearl Harbor, in this scene from a Japanese newsreel. It was obtained by the U.S. War Department and released to U.S. newsreels. (AP Photo) # 

The Japanese aircraft carrier Zuikaku, seen in September of 1941. The Zuikaku would soon sail toward Hawaii, one of six aircraft carriers used in the attack by the Imperial Japanese Navy. (U.S. Naval Historical Center) # 

Aircraft prepare to launch from the Imperial Japanese Navy aircraft carrier Akagi during the December 7, 1941 attack on Pearl Harbor, Hawaii. (National Archives) # 

This photograph, from a Japanese film later captured by American forces, was taken aboard the Japanese aircraft carrier Zuikaku, just as a Nakajima "Kate" B-5N bomber launched off the deck to attack Pearl Harbor, Hawaii, on December 7, 1941. (AP Photo) # 

Aerial view of the initial blows struck against American ships, as seen from a Japanese plane over Pearl Harbor. (U.S. Navy) # 

Captured Japanese photograph taken during the attack on Pearl Harbor, December 7, 1941. In the distance, the smoke rises from Hickam Field. (U.S. Navy) # 

Seen from a distance, the Battleship Arizona burns as it sinks in Pearl Harbor after the December 7, 1941 raid by Japanese bombers. (U.S. Navy) # 

A Japanese bomber, its diving flaps down, was photographed by a U.S. Navy photographer as the plane approached its Pearl Harbor objective on December 7. (AP Photo) # 

Japanese aircraft can be seen in the air above Pearl Harbor (top center and upper right) in this captured Japanese photograph taken during the initial moments of the Japanese attack. (U.S. Navy) # 

American ships burn during the Japanese attack on Pearl Harbor, Hawaii, on December 7, 1941. (AP Photo) # 

A wide-angle view of the sky above Pearl Harbor, Hawaii, filled with smoke and anti-aircraft fire on December 7, 1941. (National Archives) # 

Officers' wives, investigating explosions and seeing a smoke pall in distance on December 7, 1941, heard neighbor Mary Naiden, then an Army hostess who took this picture, exclaim "There are red circles on those planes overhead. They are Japanese!" Realizing war had come, the two women, stunned, started toward quarters. (AP Photo/Mary Naiden) # 

Aerial photograph, taken by a Japanese pilot, of the attack on Pearl Harbor, a Japanese bomber in lower-right foreground. (Library of Congress) # 

Sailors stand among wrecked airplanes at Ford Island Naval Air Station as they watch the explosion of the USS Shaw in the background, during the Japanese surprise attack on Pearl Harbor, Hawaii, December 7, 1941. (AP Photo) # 

A U.S. flag flies from the stern of the sunken battleship USS West Virginia after the Japanese attack on Pearl Harbor, December 7, 1941. (U.S. Navy) # 

An A6M-2 Zero fighter aboard the Imperial Japanese Navy carrier Akagi during the Pearl Harbor attack mission. (U.S. Navy) # 

The USS Shaw burns in Pearl Harbor. Japanese bombers hit the forward portion of the ship with three bombs. The resulting fires proved uncontrollable, and Shaw was ordered abandoned. Soon after, her forward ammunition magazines detonated in a spectacular blast, completely removing her bow. (U.S. Navy) # 

The USS California sinks into the mud of Pearl Harbor on December 7, 1941. (U.S. Navy) # 

A small boat rescues a USS West Virginia crew member from the water after the Japanese bombing of Pearl Harbor, Hawaii, on December 7, 1941. Two men can be seen on the superstructure, upper center. The mast of the USS Tennessee is beyond the burning West Virginia. (AP Photo) # 

The forward magazines of USS Arizona explode after she was hit by a Japanese bomb on December 7, 1941. Frame clipped from a color motion picture taken from on board USS Solace. (U.S. Navy Photograph, National Archives) # 

Japanese planes over Hawaii during the attack on Pearl Harbor are shown in this scene from a Japanese newsreel. The film was obtained by the U.S. War Department and later released to U.S. newsreels. (AP Photo) # 

Sailors at Naval Air Station (NAS) Kaneohe attempt to salvage a burning PBY Catalina in the aftermath of the Japanese attack on Pearl Harbor. (U.S. Navy) # 

The battleships West Virginia and Tennessee burning after the Japanese attack on Pearl Harbor, on December 7, 1941. (U.S. Navy) # 

Oil burns on the waters of Pearl Harbor, near the naval air station, after the Japanese attack on Pearl Harbor on December 7, 1941. (U.S. Navy) # 

The USS Maryland, a battleship moored inboard of the USS Oklahoma, which capsized, was damaged slightly in the Japanese attack on Pearl Harbor on December 7, 1941. (AP Photo) # 

A sailor killed by the Japanese air attack at Naval Air Station, Kanoehe Bay. Photographed on December 7, 1941. (U.S. Navy) # 

The battleship USS Arizona belches smoke as it topples over into the sea during a Japanese surprise attack on Pearl Harbor, Hawaii. (AP Photo) # 

White House reporters dash for the telephones on December 7, 1941, after they had been told by presidential press secretary Stephen T. Early that Japanese submarines and planes had just bombed the U.S. Pacific fleet at Pearl Harbor, Hawaii. (AP Photo) # 

Selling papers on December 7, 1941 at Times Square in New York City, announcing that Japan has attacked U.S. bases in the Pacific. (AP Photo/Robert Kradin) # 

Declaring Japan guilty of a dastardly unprovoked attack, U.S. President Franklin D. Roosevelt asked Congress to declare war, on December 8, 1941. Listening are Vice President Henry Wallace, left, and House Speaker Sam Rayburn. (AP Photo) # 

President Roosevelt signs the declaration of war following the Japanese bombing of Pearl Harbor, at the White House in Washington, D.C., on December 8, 1941. (AP Photo) # 

Young Japanese Americans, including several Army selectees, gather around a reporter's car in the Japanese section of San Francisco, on December 8, 1941. (AP Photo) # 

The minelayer USS Oglala lies capsized after being attacked by Japanese aircraft and submarines in the attack on Pearl Harbor. (U.S. Navy) # 

Heavy damage is seen on the destroyers USS Downes and USS Cassin, stationed at Pearl Harbor, after the Japanese attack on the Hawaiian island on December 7, 1941. (AP Photo/U.S. Navy) # 

An interior shot of a destroyed aircraft hangar at Wheeler Field, in Hawaii, on December 11, 1941. (U.S. Navy) # 

In this photo provided by the U.S. Navy, eight miles from Pearl Harbor, shrapnel from a Japanese bomb riddled this car and killed three civilians in the attack of December 7, 1941. Two of the victims can be seen in the front seat. The Navy reported there was no nearby military target. (AP Photo/U.S. Navy) # 

Wreckage of the first Japanese plane shot down during the attack on Pearl Harbor on December 7, 1941. (U.S. Air Force photo) # 

A Japanese midget submarine, part of the attacking force on Pearl Harbor, beached at Bellows Field. (U.S. Navy) # 

Warning:
This image may contain graphic or
objectionable content
Click to view image
An American seaman looks at the charred corpse of a Japanese flier brought up from the bottom of Pearl Harbor, where he crashed with his burning plane during the Japanese attack on December 7, 1941 in Hawaii. (AP Photo) # 

A small crowd inspects the damage, both inside and outside, after a Japanese bomb hit the residence of Paul Goo during the Japanese air raid on December 7, 1941. (AP Photo) # 

Unidentified attaches of the Japanese consulate began burning papers, ledgers and other records shortly after Japan went to war against the U.S., on December 7, 1941, in New Orleans, Louisiana. Police later stopped the fire after most of the papers had been destroyed. (AP Photo/Horace Cort) # 

This unidentified Japanese man turns to face a visitor at the Japanese Consulate in Chicago, on December 9, 1941. Clad only in underwear, he was startled while in the act of taking papers and files from a cabinet. Confidential papers at the consulate had been burned. (AP Photo) # 

Following Hawaiian tradition, sailors honor men killed during the December 7, 1941, Japanese attack on Naval Air Station Kaneohe, Oahu. The casualties had been buried on December 8. This ceremony took place sometime during the following months. (U.S. Navy) # 

Aerial view showing oil-streaked waters and the dry docks at U.S. Naval Base Pearl Harbor, Hawaii, following the Japanese attack, seen on December 10, 1941. (U.S. Navy)
Starting with the Invasion of Sicily in July of 1943, and culminating in the June 6, 1944, D-Day invasion of Normandy, Allied forces took the fight to the Axis powers in many locations across Western Europe. The push into Italy began in Sicily, but soon made it to the Italian mainland, with landings in the south. The Italian government (having recently ousted Prime Minister Benito Mussolini) quickly signed an armistice with the Allies -- but German forces dug in and set up massive defensive lines across Italy, prepared to halt any armed push to the north. After several major offensives, the Allies broke through and captured Rome on June 4, 1944. Two days later on D-Day, the largest amphibious invasion in history took place. Nearly 200,000 Allied troops boarded 7,000 ships and more than 3,000 aircraft and headed toward Normandy. Some 156,000 troops landed on the French beaches , 24,000 by air and the rest by sea, where they met stiff resistance from well-defended German positions across 50 miles of French coastline. After several days of intense warfare, Allied troops gained tenuous holds on several beaches, and they were able to dig in with reinforcements and bombardment. By the end of June, Allies were in firm control of Normandy, and on August 25, Paris was liberated by the French Resistance with help from the French Forces of the Interior and the U.S. 4th Infantry Division. In September, the Allies launched another major invasion, Operation Market Garden, the largest airborne operation of its time, in which tens of thousands of troops descended on the Netherlands by parachute and glider. Though the landings were successful, troops on the ground were unable to take and hold their targets, including bridges across the Rhine River. Despite that setback, by late 1944, the Allies had successfully established a Western Front and were preparing to advance on Germany. 
While under attack of heavy machine gun fire from the German coastal defense forces, American soldiers wade ashore off the ramp of a U.S. Coast Guard landing craft, during the Allied landing operations at Normandy, France on D-Day, June 6, 1944. (AP Photo) 
While under attack of heavy machine gun fire from the German coastal defense forces, American soldiers wade ashore off the ramp of a U.S. Coast Guard landing craft, during the Allied landing operations at Normandy, France on D-Day, June 6, 1944. (AP Photo)


In July of 1943, Allied Forces' troops, guns and transport are rushed ashore, ready for action, at the opening of the Allied invasion of the Italian island of Sicily. (AP Photo) # 

During the invasion of Sicily by Allied forces, an American cargo ship, loaded with ammunition, explodes after being hit by a bomb from a German plane off Gela, on the southern coast of Sicily, on July 31, 1943. (AP Photo) # 

Over the body of a dead comrade, Canadian infantrymen advance cautiously up a narrow lane in Campochiaro, Italy, on Nov. 11, 1943. The Germans left the town as the Canadians advanced, leaving only nests of snipers to delay the progress. (AP Photo) # 

A Royal Air Force Baltimore light bomber drops a series of bombs during an attack on the railway station and junction at the snow-covered town of Sulmona, a strategic point on the east-west route across Italy, in February of 1944. (AP Photo) # 

German infantrymen take cover in a house in southern Italy, on February 6, 1944, awaiting the word to attack after Stukas had done their work. (AP Photo) # 

Artillery observers of the Fifth Army look over the German-held Italian town of San Vittore, on November 1, 1943, before an artillery barrage to dislodge the Germans. (AP Photo) # 

Desolation in the Italian city of Cassino in May of 1944, the day after the city's capture by the Allies. Hangman's Hill is shown in the background, scene of bitter fighting during the long and bitter siege of the stronghold. (AP Photo) # 

A U.S. reconnaissance unit searches for enemy snipers in Messina, Sicily, on August 1943. (AP Photo) # 

An Italian woman kisses the hand of a soldier of the U.S. Fifth Army after troops move into Naples in their invasion and advance northward in Italy, on October 10, 1943. (AP Photo) # 

U.S. soldiers march past the historical Roman Colosseum and follow their retreating enemy in Rome, Italy, on June 5, 1944. (AP Photo) # 

Lt. Gen. Lucian K. Truscott, Jr., commanding general of the Fifth Army in Italy, talks to African American troops of the 92nd Infantry Division after they threw back a German attack in the hills north of Viareggio, Italy in 1944. (AP Photo) # 

Mt. Vesuvius spewing ash into the sky, erupting as a U.S. Army jeep speeds by shortly after the arrival of the Allied forces in Naples, Italy in 1944. (AP Photo) # 

A low-flying Allied plane sends German soldiers running for shelter on a beach in France, before D-Day in 1944. The fliers were taking photos of German coastal barriers in preparation for the upcoming June 6 invasion. (AP Photo) # 

General Dwight D. Eisenhower gives the order of the Day. "Full victory - nothing else" to paratroopers in England on June 6, 1944, just before they board their airplanes to participate in the first assault in the invasion of the continent of Europe. All of the men with General Eisenhower are members of Company E, 502d. (U.S. Army) # 

American troops march through the streets of a British port town on their way to the docks where they will be loaded into landing craft for the D-Day assault in June of 1944. (U.S. Army) # 

U.S. Rangers on a troop ship in an English port waiting for the signal to sail to the coast of Normandy. Clockwise, starting from far left, is First Sergeant Sandy Martin, who was killed during the landing, Technician Fifth Grade Joseph Markovich, Corporal John Loshiavo, and at bottom, Private First Class Frank E. Lockwood. (U.S. Army) # 

A section of the Armada of Allied landing craft with their protective barrage balloons head toward the French coast, in June of 1944. (AP Photo) # 

Smoke streams from a U.S. coast guard landing craft approaching the French Coast on June 6, 1944 after German machine gun fire caused an explosion by setting off an American soldier's hand grenade. (AP Photo) # 

Canadian soldiers land on Courseulles Beach in Normandy, on June 6, 1944 as Allied forces storm the Normandy beaches on D-Day, June 6, 1944. (STF/AFP/Getty Images) # 

Some of the first assault troops to hit the beachhead in Normandy, France take cover behind enemy obstacles to fire on German forces as others follow the first tanks plunging through the water towards the German-held shore on June 6, 1944. (AP Photo) # 

U.S. reinforcements wade through the surf as they land at Normandy in the days following the Allies' June 1944 D-Day invasion of France. (AP Photo/Peter Carroll) # 

Members of an American landing party help others whose landing craft was sunk by enemy action of the coast of France. These survivors reached Omaha Beach by using a life raft on June 6, 1944. (U.S. Army) # 

Canadian soldiers from 9th Brigade land with their bicycles at Juno Beach in Bernieres-sur-Mer during D-Day, while Allied forces were storming the Normandy beaches. (STF/AFP/Getty Images) # 

American soldiers on Omaha Beach recover the dead after the June 6, 1944, D-Day invasion of France. (Walter Rosenblum/LOC) # 

Thirteen liberty ships, deliberately scuttled to form a breakwater for invasion vessels landing on the Normandy beachhead lie in line off the beach, shielding the ships in shore. The artificial harbor installation was prefabricated and towed across the Channel in 1944. (AP Photo) # 

Allied troops unload equipment and supplies on Omaha Beach in Normandy, France, in early June of 1944. (U.S. Army) # 

Tow planes and gliders above the French countryside during the Normandy invasion in June of 1944, at an objective of the U.S. Army Ninth Air Force. Gliders and two planes are circling and many gliders have landed in fields below. (AP Photo/U.S. Air Force) # 

Warning:
This image may contain graphic or
objectionable content
Click to view image
An American soldier, who died in combat during the Allied invasion, lies on the beach of the Normandy coast, in the early days of June 1944. Two crossed rifles in the sand next to his body are a comrade's last reverence. The wooden structure on the right, normally veiled by high tide water, was an obstruction erected by the Germans to prevent seaborne landings. (AP Photo) # 

Reinforcements for initial allied invaders of France, long lines of troops and supply trucks begin their march on June 18, 1944, in Normandy. (AP Photo) # 

American dead lie in a French field, a short distance from the allied beachhead in France on June 20, 1944. (AP Photo/U.S. Signal Corps) # 

American soldiers race across a dirt road, which is under enemy fire, near St. Lo, in Normandy, France, on July 25, 1944. Others crouch in the ditch before making the crossing. (AP Photo) # 

Warning:
This image may contain graphic or
objectionable content
Click to view image
An American soldier lies dead beside water pump, killed by a German booby trap set in the pump in a French village on the Cherbourg Peninsula, on June 18, 1944. (AP Photo/Peter Carroll) # 

These five Germans were wounded and left without food or water for three days, hiding in a Normandy farmhouse waiting for a chance to surrender. Acting on information received from a French couple, U.S. soldiers went to the barn only to be attacked by snipers who seemed determined upon preventing their comrades from falling into Allied hands. After a skirmish, the snipers were dealt with and the wounded Germans taken captive, in France on June 14, 1944. (AP Photo) # 

Warning:
This image may contain graphic or
objectionable content
Click to view image
The dead German soldier in this June 1944 photo was one of the "last stand" defenders of German-held Cherbourg. Captain Earl Topley, right, who led one of the first American units into the city on June 27, said the German had killed three of his men. (AP Photo) # 

Helmets discarded by German prisoners, who were taken to a prison camp, in a field in Normandy, France in 1944. (NARA) # 

In the sky above the Netherlands, American tow planes with gliders strung out behind them fly high over windmill in Valkenswaard, near Eindhoven, on their way to support airborne army in Holland, on September 25, 1944. (AP Photo) # 

Parachutes open as waves of paratroops land in Holland during operations by the 1st Allied Airborne Army in September of 1944. Operation Market Garden was the largest airborne operation in history, with some 15,000 troops were landing by glider and another 20,000 by parachute. (Army) # 

The haystack at right would have softened the landing for this paratrooper who took a tumble during operations in Holland by the 1st Allied Airborne Army on September 24, 1944. (U.S. Army) # 

In France, an American officer and a French Resistance fighter are seen engaged in a street battle with German occupation forces during the days of liberation, August 1944, in an unknown city. (AP Photo) # 

People try to cross a damaged bridge in Cherbourg, France on July 27, 1944. (AP Photo) # 

An American version of a sidewalk cafe, in fallen La Haye du Puits, France on July 15, 1944, as Robert McCurty, left, from Newark, New Jersey, Sgt. Harold Smith, of Brush Creek, Tennessee, and Sgt. Richard Bennett, from Wilkes Barre, Pennsylvania, raise their glasses in a toast. (AP Photo) # 

A view from a hilltop overlooking the road leading into St. Lo in July of 1944. Two French children in the foreground watch convoys and trucks of equipment go through their almost completely destroyed city en route to the front. (AP Photo) # 

Crowds of Parisians celebrating the entry of Allied troops into Paris scatter for cover as a sniper fires from a building on the place De La Concorde. Although the Germans surrendered the city, small bands of snipers still remained. August 26, 1944. (U.S. Army) # 

After the French Resistance staged an uprising on August 19, American and Free French troops made a peaceful entrance on August 25, 1944. Here, four days later, soldiers of Pennsylvania's Twenty-eighth Infantry Division march along the Champs-Elysees, with the Arc de Triomphe in the background. (AP Photo/Peter J. Carroll)

German Wehrmacht General Anton Dostler is tied to a stake before his execution by a firing squad in a stockade in Aversa, Italy, on December 1, 1945. The General, Commander of the 75th Army Corps, was sentenced to death by an United States Military Commission in Rome for having ordered the shooting of 15 unarmed American prisoners of war, in La Spezia, Italy, on March 26, 1944. (AP Photo)

Hermann Goering, once the leader of the formidable Luftwaffe and second in command of the German Reich under Hitler, appears in a mugshot on file with the Central Registry of War Criminals and Security Suspects in Paris, France, on November 5, 1945. Goering surrendered to U.S. soldiers in Bavaria, on May 9, 1945, and was eventually taken to Nuremburg to face trial for War Crimes. (AP Photo) # 

The interior of the courtroom of the Nuremberg War Crimes Trials in 1946 during the Trial of the Major War Criminals, prosecuting 24 government and civilian leaders of Nazi Germany. Visible here is Hermann Goering, former leader of the Luftwaffe, seated in the box at center right, wearing a gray jacket, headphones, and dark glasses. Next to him sits Rudolf Hess, former Deputy Fuhrer of Germany, then Joachim von Ribbentrop, former Nazi Minister of Foreign Affairs, Wilhelm Keitel, former leader of Germany's Supreme Command (blurry face), and Ernst Kaltenbrunner, the highest ranking surviving SS-leader. Goering, von Ribbentrop, Keitel, and Kaltenbrunner were sentenced to death by hanging along with 8 others -- Goering committed suicide the night before the execution. Hess was sentenced to life imprisonment, which he served at Spandau Prison, Berlin, where he died in 1987. (AP Photo/STF) # 


On May 21, Colonel Bird, Commandant of Belsen Camp, gave the order for the last hut at Belsen Concentration Camp to be burned. A rifle salute was fired in honor of the dead, the British flag was run up at the same moment as a flame-thrower set fire to the last hut. A German flag and portrait of Hitler went up in flames inside the hut in June of 1945. (AP Photo/British Official Photo) # 

German mothers walk their children to school through the streets of Aachen, Germany, on June 6, 1945, for registration at the first public school to be opened by the U.S. military government after the war. (AP Photo/Peter J. Carroll) # 

A general view of the International Military Tribunal for the Far East meeting in Tokyo in April, 1947. On May 3, 1946, the Allies began the trial of 28 Japanese civilian and military leaders for war crimes. Seven were hanged and others were sentenced to prison terms. (AP Photo) # 

Soviet soldiers on the march in northern Korea in October of 1945. Japan had ruled the Korean peninsula for 35 years, until the end of World War II. At that time, Allied leaders decided to temporarily occupy the country until elections could be held and a government established. Soviet forces occupied the north, while U.S. forces occupied the south. The planned elections did not take place, as the Soviet Union established a communist state in North Korea, and the U.S. set up a pro-western state in South Korea - each state claiming to be sovereign over the entire peninsula. This standoff led to the Korean War in 1950, which ended in 1953 with the signing of an armistice -- but, to this day, the two countries are still technically at war with each other. (Waralbum.ru) # 

In this October 1945 photo from North Korea's official Korean Central News Agency, communist leader Kim Il Sung chats with a farmer from Qingshanli, Kangso County, South Pyongyang in North Korea. (Korean Central News Agency/Korea News Service via AP Images) # 

| Soldiers of the Chinese communist Eighth Route Army on the drill field at Yanan, capital of a huge area in North China which is governed by the Chinese Communist Party, seen on March 26, 1946. These soldiers are members of the "Night Tiger" battalion. The Chinese Communist Party (CPC) had waged war against the ruling Kuomintang (KMT or Chinese Nationalist Party) since 1927, vying for control of China. Japanese invasions during World War II forced the two sides to put most of their struggles aside to fight a common foreign foe -- though they did still fight each other from time to time. After World War II ended, and the Soviet Union pulled out of Manchuria, full scale civil war erupted in China in June of 1946. The KMT eventually was defeated, with millions retreating to Taiwan, as CPC leader Mao Zedong established the People's Republic of China in 1949. | |

This 1946 photograph shows ENIAC (Electronic Numerical Integrator And Computer), the first general purpose electronic computer - a 30-ton machine housed at the University of Pennsylvania. Developed in secret starting in 1943, ENIAC was designed to calculate artillery firing tables for the United States Army's Ballistic Research Laboratory. The completed machine was announced to the public on February 14, 1946. The inventors of ENIAC promoted the spread of the new technologies through a series of influential lectures on the construction of electronic digital computers at the University of Pennsylvania in 1946, known as the Moore School Lectures. (AP Photo) # 

A test nuclear explosion codenamed "Baker", part of Operation Crossroads, at Bikini Atoll in the Marshall Islands, on July 25, 1946. The 40 kiloton atomic bomb was detonated by the U.S. at a depth of 27 meters below the ocean surface, 3.5 miles from the atoll. The purpose of the tests was to study the effects of nuclear explosions on ships. 73 ships were gathered to the spot -- both obsolete American and captured ships, including the Japanese battleship "Nagato". (NARA) # 

Northrop's Flying Wing Bomber known as the XB-35 in flight in 1946. The XB-35 was an experimental heavy bomber developed for the U.S. Army Air Force during World War II. The project was terminated shortly after the war, due to its technical difficulties. (AP Photo) # 

Japanese ammunition being dumped into the sea on September 21, 1945. During the U.S. occupation, almost all of the Japanese war industry and existing armament was dismantled. (U.S. Army) # 

These unidentified German workers in Decontamination clothing destroy toxic bombs on June 28, 1946, at the U.S. Army Chemical Warfare Service Depot, at St. Georgen, Germany. The destruction and disposal of 65,000 dead weight tons of German toxics, including mustard gas, was accomplished in one of two ways: Burning or dumping the empty shells and bombs into the North Sea. (AP Photo) # 

U.S. military authorities prepare to hang Dr. Klaus Karl Schilling, 74, at Landsberg, Germany, on May 28, 1946. In a Dachau war crimes trial he was convicted of using 1,200 concentration camp prisoners for malaria experimentation. Thirty died directly from the inoculations and 300 to 400 died later from complications of the disease. His experiments, all with unwilling subjects, began in 1942. (AP Photo/Robert Clover) # 

The new cemetery at Belsen, Germany on March 28, 1946, where 13,000 people who died after Belsen Concentration Camp was liberated are buried. (AP Photo) # 

Jewish survivors of the Buchenwald Nazi concentration camp, some still in their camp clothing, stand on the deck of the refugee immigration ship Mataroa, on July 15, 1945 at Haifa port, during the British Mandate of Palestine, in what would later become the State of Israel. During World War II, millions of Jews were fleeing Germany and its occupied territories, many attempting to enter the British Mandate of Palestine, despite tight restrictions on Jewish immigration established by the British in 1939. Many of these would-be immigrants were caught and rounded up into detention camps. In 1947, Britain announced plans to withdraw from the territory, and the United Nations approved the Partition Plan for Palestine, establishing a Jewish and a Palestinian state in the country. On May 14, 1948, Israel declared independence and was immediately attacked by neighboring Arab states, beginning the Arab-Israeli conflict which continues to this day. (Zoltan Kluger/GPO via Getty Images) # 

Some of Poland's thousands of war orphans at the Catholic Orphanage in Lublin, on September 11, 1946, where they are being cared for by the Polish Red Cross. Most of the clothing, as well as vitamins and medicines, are provided by the American Red Cross. (AP Photo) # 

The Empress of Japan visits a Catholic Orphanage staffed by Japanese Nuns for children who have lost their parents in the war and air raids over Tokyo. The Empress inspected the grounds and paid a visit to the chapel. Children wave Japanese flags to greet the Empress during her visit in Fujisawa in Tokyo, on April 13, 1946. (AP Photo) # 

New buildings (right) rise out of the ruins of Hiroshima, Japan, on March 11, 1946. These single story homes built along a hard-surfaced highway are part of the program by the Japanese government to rebuild devastated sections of the country. At left background are damaged buildings whose masonry withstood the effects of the first atomic bomb ever detonated as a weapon. (AP Photo/Charles P. Gorry) # 

Clocks are being readied for export to Allied countries, shown as collateral for imported goods needed by Japan. Thirty-four Japanese factories produced 123,000 clocks during April of 1946. Photo taken on June 25, 1946. (AP Photo/Charles Gorry) # 

U.S. General George S. Patton acknowledges the cheers of thousands during a parade through downtown Los Angeles, California, on June 9, 1945. Shortly thereafter, Patton returned to Germany and controversy, as he advocated the employment of ex-Nazis in administrative positions in Bavaria; he was relieved of command of the 3rd Army and died of injuries from a traffic accident in December, after his return home. Joe Rosenthal's famous Iwo Jima flag-raising photograph is visible on the war bonds billboard. (AP Photo) # 

This 1945 photo shows German women clearing up the debris on Berlin's Tauentzienstrasse, with the ruins of the Kaiser Wilhelm Church in the background. The absence of able bodied men meant that the responsibility for clearing the wreckage fell mainly to civilian women, which were called "Truemmerfrauen," or rubble ladies. The signs on the left mark the border between the British-occupied sector and the U.S. sector of the city. (AP Photo) # 

The scene in Berlin's Republic Square, before the ruined Reichstag Building, on September 9, 1948, as Anti-Communists, estimated at a quarter of a million, scream their opposition to Communism. At the time, the Soviet Union was enforcing the Berlin Blockade, blocking Allied access to the parts of Berlin under Allied control. In response, Allies began the Berlin Airlift until the Soviets lifted the blockade in 1949, and East Germany and West Germany were established. When the meeting pictured here broke up, a series of incidents between Anti-Red Germans and Soviet troops brought tension to a fever pitch as shootings took place, resulting in the deaths of two Germans. (AP-Photo) # 

In March of 1974, some 29 years after the official end of World War II, Hiroo Onoda, a former Japanese Army intelligence officer, walks out of the jungle of Lubang Island in the Philippines, where he was finally relieved of duty. He handed over his sword (hanging from his hip in photo), his rifle, ammunition and several hand grenades. Onoda had been sent to Lubang Island in December of 1944 to join an existing group of soldiers and hamper any enemy attacks. Allied forces overtook the island just a few months later, capturing or killing all but Onoda and three other Japanese soldiers. The four ran into the hills and began a decades-long insurgency extending well past the end of the war. Several times they found or were handed leaflets notifying them that the war had ended, but they refused to believe it. In 1950, one of the soldiers turned himself in to Philippine authorities. By 1972, Onoda's two other compatriots were dead, killed during guerrilla activities, leaving Onoda alone. In 1974, Onoda met a Japanese college dropout, Norio Suzuki, who was traveling the world, and through their friendship, Onoda's former commanding officer was located and flew to Lubang Island to formally relieve Onoda of duty, and bring him home to Japan. Over the years, the small group had killed some 30 Filipinos in various attacks, but Onoda ended up going free, after he received a pardon from President Ferdinand Marcos. (AP Photo) #

This is an aerial view of the city of London around St. Paul's Cathedral showing bomb-damaged areas in April of 1945. (AP Photo) #
No comments:
Post a Comment